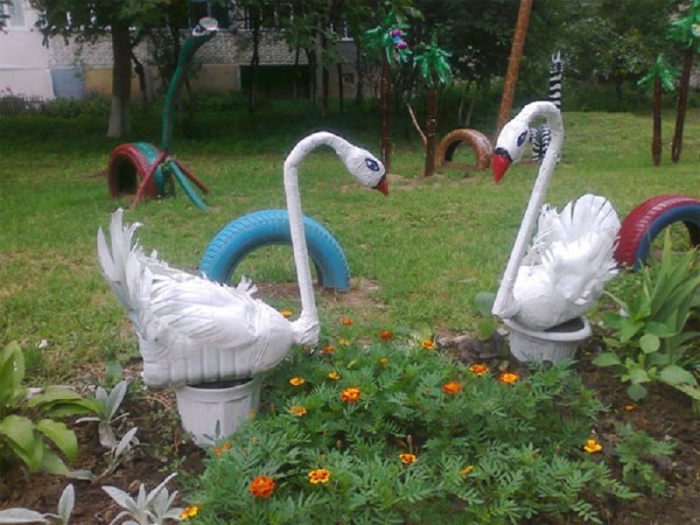
A very beautiful craft is often made - a do-it-yourself swan for the garden. Nowadays it is very fashionable to decorate your home with handmade crafts: it is elegant, popular and beautiful. The garden deserves special attention. A swan and a flowerbed, for example, carry the energy of the owner and bring him success, because it is not for nothing that such great attention is paid to this.
Figures of swans made of wood, clay or tires can decorate any summer cottage.
Particularly demanding people can make a decorative element to their liking, adding designer flair and a personal vision of decoration. And the fruits of one’s own labor are pleasing to the eye and self-esteem. An unbridled desire to create can turn into a masterpiece of art. Thoughtful inventors have adapted to making sculptures from scrap materials. This is considered a trendy, environmental trend in decoration. Without special material and time costs, you can make a unique decoration for the garden.
The swan is the embodiment of all positive qualities and characteristics, which is why many people want to have a sculpture of it in their garden. The high cost of finished products and doubts about their quality and service life make you think and put your imagination into action.
Materials for production
To make a swan sculpture for the garden, scrap materials are used. These can be damaged rubber tires, tires, plastic bottles, spoons, bags, wood, stones, building materials and auxiliary aids.

Swans can be assembled from petals cut from plastic bottles.
There are very well-known options for crafts made from plastic bottles, which are durable and versatile in use. Used tires can be used in a similar way, you just need to cut and paint the material correctly. Such sculptures can have a practical meaning, since they can act as a pond, flower bed or flower bed, but they are also an aesthetic decoration that emphasizes the theme of the garden. Polyethylene bags do not have a long service life, but can compete with other materials.
Wood is a less commonly used material and requires skill and manual dexterity. It is only available for use by qualified personnel. Stones, due to material costs and physical effort, compete with other materials, but are distinguished by durability, sophisticated style and elegance. Construction mixtures can be useful in this matter, because they are affordable and easy to process; Special attention should be paid to gypsum and cement mortars.
Return to contents
Swan made of rubber tires
Old car tires can be given a second life by finding great uses for them in the garden. So, from them you can make one of the fairy-tale characters. A swan made from rubber tires is the most affordable and economical means for decorating a garden, because old tires are also useful here. Probably everyone has met one of these in crowded houses. So, to make a swan from tires, you should get a tool. First you need to prepare a work surface, cover it so that you can work without polluting either the product or the workspace.
The next step should be the direct selection of material. You should choose the most worn tire with a longitudinal pattern for ease of working with it and painting the finished product. Next, you need to thoroughly clean it of any dirt, dust and other interference in operation, and dry it. So, we have prepared the material for further processing.

Then you should mark the surface of the tire into parts and cut it along the contour with a jigsaw. To make the product you will also need a metal rod, drill, wire and pliers. Any owner can find these handy tools.
The marking is carried out on an already cleaned wheel. Initially, you need to draw the outline of the future swan with chalk and cut it out with a jigsaw. You can use a sharp knife, grinder and other convenient tools. At the same time, it is important to remember safety and not neglect basic rules in order to avoid injury and other troubles. It is best to move from head to tail in parallel lines for ease of use of auxiliary tools. The edges of the trim must be processed - smoothed with a knife or grinder.
Then you need to turn the product inside out and form the body of a swan, the bend of the wings and neck. This will help to do this with a metal rod or wire attached at the base of the tail and along the body. Then you need to give the product an appearance by painting it in certain colors, highlighting the beak and eyes. Installation of the work is the final stage of production. To do this, you can use another tire or stump.
We fix the swan and decorate it with lush vegetation and colorful flowers. It is known that in nature swans are devoted lovers, so making a pair of swans would be appropriate. They will perfectly decorate a garden, pond, flower bed, abandoned stump and complement the decor.
Return to contents
Swan in the garden made of plastic spoons
Plastic spoons are a very cheap and durable material. So, you need to stock up on plastic spoons of the same color, preferably white, clean them and prepare them for use.

A swan for the garden can be made from plastic spoons.
First of all, you need to make a swan frame on which the spoons will be attached.
It can be made from a plastic bottle or wire and wrapped with bags, paper and tape to give it shape.
Then you need to form the silhouette of a swan, pointing the head, beak, spreading the wings, and paste the silhouette with spoons on the inside of the product.
This will create a plumage effect and decorate the appearance of the craft. The beak must be highlighted in a different color and the eyes drawn. You can fix the product on a stump or another part of the garden, taking into account windy weather and rain.
While walking through a park or pine forest, it’s hard to resist taking home a few round cones from last year. A simple but very cute “Swan” craft will help you use these.
The swan itself is made from a pine cone using, and the main craft will be an unnecessary CD. Additionally you will need white paint and a brush.
Using a brush, we cover the entire cone with white, applying it in a fairly dense layer.

Leave to dry. In order not to stain the table, it is better to place a disposable washable plate or oilcloth under it.

We move on to the next stage of work - modeling. Roll out white plasticine into a neat, even tube.

We make a small “droplet” from red, and two small balls from black.

"Droplet" and balls
We attach a droplet to the tip of the tube, and the balls above it. The result is a swan head with a long neck.

Let's take the CD.

We make a flat cake from white, trim it along the edges, giving it the shape of a circle. You can use some object with a round bottom for this purpose - then the task will become more interesting.

Attach the resulting circle to the center of the CD.

Place a painted cone on top of the rib. We press it well into the plasticine to fix it in the right place.

We attach a plasticine swan neck with a head to it. The swan made from plasticine and pine cones is ready, all that remains is to add some additional touches.

We cut out flowers from pale yellow paper, and leaves from green paper.

Glue the flowers to the leaves. We bend their petals slightly to give the shape of cups.
The swan craft is often made to decorate the garden, because this bird is very beautiful. For its manufacture, various materials are used, which, as a rule, are at hand. Depending on the place where the craft is used, the swan can be made of paper, car tires, plastic bottles and other materials.
A craft like a swan can be made from pine cones and chenille wire. Also, to make it you will need universal glue, unnecessary disks, a plastic lid, a foam plate, and toy eyes.

First you need to make a neck from chenille wire. Place one end of the wire on the glue, inserting cones between the scales, and bend the other end, giving the swan's neck a characteristic bend.
All that remains is to glue the eyes and make a beak from foam rubber (make the beak red - many types of swans have red beaks). The swan craft is ready. To ensure the stability of the product, the bird should be secured on a plastic lid, which will serve as a stand for the craft.

If you want your swan to be white, apply white paint to the craft. You can paint it black and you'll get a black swan.
Now you should start making the pond. To do this, you need to take a foam plate and apply blue paint on it. After drying, place a swan in the center of the resulting pond. You can also use unnecessary disks to make a pond, decorate them with lace ribbon, then secure your swan in the middle.

This craft will be an excellent souvenir or gift for any occasion - the swan looks very elegant and original. If you want to give a gift to a couple in love, then make two graceful birds, because everyone knows that swans are a symbol of fidelity and devotion.
Craft for the garden - flowerpot in the shape of a swan
One of the popular types of garden crafts is a flowerpot in the shape of a swan, since it is not only a decorative element, but also an original flower garden. To make it you must acquire:
- 5-liter plastic bottle (preferably not round, but rectangular - for stability);
- iron rod 0.6 mm thick;
- putty or plaster;
- gauze bandage;
- spatula;
- brush;
- tile adhesive;
- sand;
- primer;
- paint;
- varnish;
- iron mesh;
- sandpaper;
- polyethylene;
- water;
- container for mixing the solution.
So, you need to cut off the top from the side of the bottle and pour moistened sand into it (then you will replace it with earth, but for now it will be more convenient to make your swan with it). But before that, you need to give the rod the shape of a swan neck and insert it into the hole made in the bottle cap. Secure the rod with tile adhesive.

Then lay down the polyethylene, mix a solution of putty to make the bottom, which must be applied to it with a spatula.
After applying the layer, place the bottle frame on it and continue applying putty from the bottom to the edges.
Coat the rod and the cork with a putty solution step by step to create a smooth transition from the body to the neck of the bird. Level the surface after applying the putty with a brush dipped in water. Try to work quickly so that the putty does not dry out.
Coat the entire structure with a thick layer of mortar.
Make wings using an iron mesh measuring 15x30 cm, bending it slightly so that it looks like a wing. Fix the wings with a solution. After they dry, you need to apply putty on the inside and outside of the wings using your hands.
While the putty is drying, roll a small ball and secure it to the end of the rod, spreading it over the neck with a damp brush. Make a head with a beak from the ball.

Then take a bandage, cut into pieces, and wet it. Wrap a wet bandage around the entire neck, pressing it slightly with your hands. Do the same near the beak.
Make a tail from a small piece of mesh, bending it at an angle of 45 degrees, and fix it with putty. After drying, smooth out any unevenness with a damp brush. Then apply a layer of solution again, walking along the tail with wet hands.
Do the same actions with the head and neck. Coat the edges of the workpiece on the shoulders.
Smooth out any unevenness in the structure with a damp brush. Let dry. After this, clean off the imperfections with sandpaper and apply a primer and then paint in two layers. Color the beak and eyes. After drying, varnish - also apply the varnish in two layers. You can easily make such a craft yourself, and on the street near your country house you will have a handsome swan that will be the envy of all your neighbors.
Crafting a swan from modules requires care and a lot of time, since to create a figure you first need to make many elements. However, the time spent will be completely justified, since the process of making a swan is very exciting, and the result will delight you for a long time. This type of craft is called modular origami.
Any module is made from a paper rectangle, after which it is connected to another by laying one on top of the other.
Advice! Colored and office paper is suitable, but do not use too thin.

To get a module, take a sheet of landscape paper and divide it into 16 or 32 identical parts.
The resulting rectangle should be placed in front of you and bent in half lengthwise and crosswise. Tuck the edges to the center part and turn the structure over to the other side.
The corners at the bottom are folded up, leaving a small distance between the folded corner and the top triangle. Raise the ends up and form a triangle.
You will learn how to make a graceful paper swan craft with your own hands from the step-by-step description.

Assembling modules
To make a paper swan craft with your own hands, you will need to prepare:
- red module - 1;
- pink modules - 136;
- orange - 90;
- yellow - 60;
- green - 78;
- blue - 39;
- blue - 36;
- purple - 19.
First you need to take 3 pink modules and insert them into two pockets of one along the corner of the other two.
Next, 2 pink triangles are added in the same way to the 1st group, so you need to continue to do this. As a result, the first ring is ready, including the inner and outer rows. Each row has 30 elements. Assemble the ring along a chain, the ends of which must be connected by the last element.
Make the 3rd row from 30 orange elements, securing them in a checkerboard pattern. The 4th and 5th rows are assembled from the same modules.
Now you need to carefully turn the edges of the product up.
Using 30 yellow structural elements, lay out the 6th row, putting them on top.
When installing the 7th row, wings are made. To do this, you will need to choose the side where the head will be. Select one pair of corners from two adjacent structural elements - the neck will be formed on them. After this, a layer of 12 yellow elements is mounted to the right and left of the selected pair of corners. As a result, in the 7th row there are 24 modules and 2 spaces.
The 13th row consists of 12 blue elements, the 14th - from 10, the 15th - from 8. The 16th row includes 6 purple elements, the 17th - 4, the 18th - 2 elements.
The tail is made of five rows, each row has one less element. You will need 12 green modules and 3 blue ones.
The neck is made by inserting two corners of one structural element into two pockets of another.
The red structural element (it will be the beak) is joined by 7 purple ones, then 6 elements each of blue, cyan, green, yellow. All that remains is to give the neck the desired shape, and then secure it between the wings of the bird.
The assembly of the structure ends by preparing a stand of 36 and 40 elements in the shape of two rings, connecting them the same way you connected the neck.
Advice! If you are worried that the swan will fall apart, you can glue your bird in those places that cause concern, and glue the swan itself to the stand.
Your miracle bird is ready to delight your guests.
Paper swan using origami method
You can make a paper swan craft using traditional origami. There are no modules in it, you only need one sheet of paper, and the craft itself will take very little time. Involve your child in this activity, he will probably also enjoy mastering the art of origami.

So, instructions:
- Take a piece of paper (it should be square) and fold it diagonally. Walk along the bend in both directions.
- Bend the sheet so that the upper and lower corners of the square meet on a straight bend line.
- Bend the matching corners 1/3 of the height of the resulting triangle.
- Turn the workpiece over and bend it straight in the opposite direction
- Bend the acute corner of the formed triangle onto the wrong side at a point corresponding to approximately 1/3 of the bisector of the resulting triangle.
- Make a bird's beak. The craft is ready.

If you find it difficult to make a paper swan with your own hands using the origami method, then you can watch video tutorials that will help you understand the sequence of actions. Then you will definitely know how to make swan crafts from paper, and making such a bird will not be difficult for you.
Making a swan from tires
Crafts such as tire swans are often made to decorate the yard. With old used tires, tools and a little patience, you can create a beautiful swan. By the way, it can serve as an original flower garden for you.
So, first you should prepare the unnecessary tire.
Advice! The more worn it is, the easier it will be for you to work with it.
Outline with chalk how you will cut the tire, indicating the head, neck, wings. Then cut the tire along the markings, bend the cuts to form wings.

To maintain the shape of the swan's neck and head, you can strengthen the tire rubber with a metal plate, giving it the desired bend and screwing it to the tire with small screws.
2. So... For work we need 5-liter. plast. a square bottle, a 0.6 mm iron rod, a bandage, starting putty, a small spatula, a brush and a small container with water, a container for mixing the solution and sand or other filler. Bend the rod in the shape of a two and insert it into the hole made in the cork, fixing it from the inside, for example, with pieces of broken brick or pebbles, and seal it with tile adhesive... 
3. Pour sand (mine was wet) into the bottle and slightly widen the sides... 
4. Cover the work area with film, mix the putty solution thoroughly and use a spatula to apply a layer of solution to the film for the bottom of our flowerpot...
5. Place the workpiece on the mortar and correct the excess with a spatula from bottom to top (dip the spatula in water from time to time so that the plaster does not stick and it is easy to work)… 
6. Move on to the neck - take the solution in wet hands, form a small roller and coat the rod with the cork... 
7. Correct with a moistened brush... 
8. Using a spatula and a brush, cover the entire bottle with putty about 2 centimeters... 
9. For the wings we need this mesh 15 by 30 cm. Having slightly bent it to give the shape of the wing, we press it into our workpiece diagonally and immediately fix it with a small amount of putty... here we need to wait a little time for the putty to set. You can rest for 10-15 minutes and put a support under the back of the wing... 
10. Well, did you rest? Let's move on... We moisten our hands and take a little solution in one hand, stick it to the outside of the wing, and with the other hand we hold it all on the inside... We do the same with the second wing. Don’t be afraid, if it doesn’t stick very well, move on to doing the second wing for a while and this is how everything will work out for you alternately. Well, we’ll fix all the flaws later, when the putty dries a little... 
11. When the wings need to be given a rest, we smoothly move on to making the neck... again, with wet hands, we form a roller from the solution and attach it to the rod... 
12. Help yourself with a wet brush... 
13. As you work, wrap a wet piece of bandage around your neck and slightly squeeze everything with your hands... when the neck, at this stage of work, is finished, you can go back to the wings and make up for all the mistakes... 
14. Fix your head and calmly go to rest for about 30 minutes. 
15. It’s time to think about the tail - we bend a small piece of the mesh under the corner about 40-45 degrees and fix it with a solution and a support... 
16. To continue making the tail, spread a small amount of plaster with a brush using “up and down” and “side to side” movements, forming a small rounding along the bottom of the workpiece... 
17. Do the top of the ponytail in several approaches, alternating it with making the second layer of the neck and head... 


18. Frame the edge of the workpiece on the shoulders with a putty roller and smooth it... 

19. Top view of the resulting ponytail... 
20. Side view of the ponytail... 
21. And here, in fact, is the finished semi-finished product... look at it from all sides at this stage and hide all the flaws with putty... After a couple of hours it can be lifted and moved to another secluded place from the rain. Dry in the sun for about a couple of days, then sand with a special sandpaper for plaster (it's a mesh, if anyone doesn't know), then with regular sandpaper, prime it with a primer for painting (without primer, the paint rolled off in lumps). I painted it with regular enamel paint in two layers, then I decorated the beak and eyes and covered it with varnish in two layers. 
22. This is how I ended up with a massive male swan. But I think we still need to do it carefully!!! drill a few holes for water drainage and do a similar process of painting these holes in order to protect your work from destruction... 
23. All that was left was to plant the flowers, until only the violet kindly agreed to pose for me in a photo shoot. I think marigolds are just right for this couple, what do you think? 
Advice: Mix the putty in small portions and very thick for better work, and you will always have time to moisten it during work with the same wet hands and a wet brush. DO WITH ME, DO LIKE ME, DO BETTER THAN ME! And remember, “Don’t forbid yourself to create, even if sometimes it turns out crooked, no one can repeat your ridiculous motives!” as M. Tsvetaeva said. Good luck everyone! I will be happy to look at the swans-pots in your design! (
The graceful bird has always fascinated with its grace. It became possible to place a symbol of fidelity in your garden, having accessible material at hand for everyone. Information on how to make a swan from plastic bottles, offered in three options, will allow everyone to choose the most appropriate method.
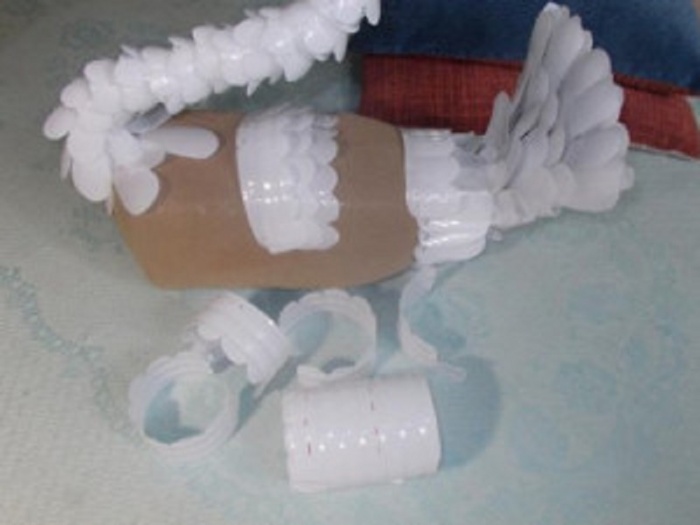
Swan flower pots made from bottles
Crafts made from plastic bottles vary in complexity. A step-by-step guide will help even a novice craftsman cope with the task of decorating a swan. The main thing is to be patient. One 5 liter bottle and a lot of 1 liter white plastic containers are the main material for an effective craft. You will also need:
- metal rod for the swan's neck;
- fishing line, tape and thin wire for connecting individual parts;
- metal mesh that serves as the base of the wings.
Preparing individual parts
Making a swan precedes the preparatory stage. The work begins with cleaning plastic bottles from remnants of labels and glue. Markings are made on clean containers according to the photo. The top line is drawn 2 cm below the neck, the bottom line is 1 cm above the corrugated part of the plastic bottle. There is a perpendicular straight line between them. The cut is performed as smoothly as possible.

For the neck, parts from plastic bottles with a neck are cut into 6 parts, cylindrical elements are divided into 8 fragments.
Attention! All corners on the blanks are rounded, and 3 paired holes are formed at the base of the petals.
A neat swan head is obtained from a 0.5 liter plastic bottle as follows:
- the neck with the stopper is removed;
- an incision is made along the seam in the cone-shaped area;
- all other cut lines are at intervals of 0.5 cm;
- the ends of the clothespin, which will play the role of the swan’s beak, are melted over the fire;
- Using an awl, holes are pierced on them; holes are formed at a similar distance in a plastic bottle.

The base of the swan's body is a 5-liter container, in the bottom and lid of which holes are made to secure the neck. The hole on the side should allow your hand to easily enter the container.
Build process
When the individual elements of the swan are decorated, you can proceed to assembling the parts:

The result of this painstaking process will be a spectacular swan made from plastic bottles, similar to the photo below:


Combined version with tire
There is another interesting and affordable option for making a bird with a majestic curved neck.
Frame
According to the proposed master class, a swan made from plastic bottles will turn out no less fascinating. The main difference is that the function of the torso is performed by a tire with a diameter of 50-55 cm.
Body Formation:
- The tire is cut in half. Work carefully to avoid injury from the cord.
- One part is shortened by 10 cm.
- Both parts are connected in the shape of an egg about 45 cm wide and securely fixed.
The result will be the workpiece shown in the photo:

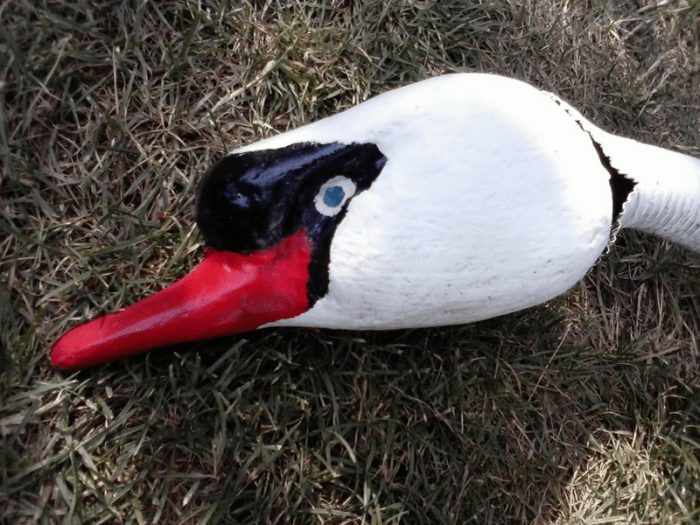
Head
Making a swan head:
- The basis of the part is foam plastic 20x12x10 cm.
- After cutting, the head and beak are thoroughly sanded with sandpaper.
- A 5 cm depression is prepared on the back of the head to secure the neck.
- The swan's head is evenly treated with putty.
- After the solution has dried, the surface is sanded with finer-grain paper.
- The workpiece is coated with white, black and blue paint. An example is the following photo:
Neck
The process of creating a bird's neck using plastic bottles:
- A rod about 2 m long is given the desired shape.
Advice! It is better to avoid the steel part; it bends too difficult and is capable of bursting.
- Corrugations will require about 80 cm. When using old material, it is thoroughly cleaned of dirt.
- One edge of the corrugation is made with cuts for mounting the swan's head.
- The swan's neck is fixed to the body and head with self-tapping screws.

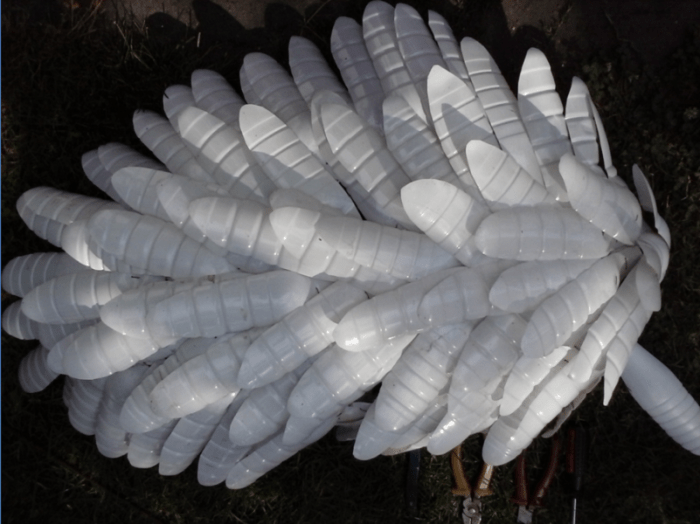
Plumage
For the swan plumage you will need:
- white plastic bottles - about 40 pieces;
- construction mesh;
- pliers and knife;
- wire, wire cutters.
Painting the mesh with white paint for exterior use will help to avoid corrosive processes. One plastic bottle serves as the basis for 5-6 swan feathers. On each plastic bottle blank, 4 holes are prepared for the wire. It is optimal to use copper material, which bends easily. The feathers are joined with overlapping wire to hide the joint areas. The process of forming the wings and tail of a swan is identical, the difference lies only in the outline of the mesh.

Installation and Installation
When all the parts from the tire and plastic bottles are ready, start assembling the swan. The area where it is planned to place the decorative figure is decorated with bricks, a board or a car tire. This will be a kind of podium.
The neck is connected to the body using self-tapping screws. The end of the rod is bent in such a way that it is possible to fix it in the ground. The wings are fastened together with wire and clamped at the back with a rod. Next, the swan's tail is fixed. The head, made from a plastic bottle, is screwed to the corrugation with screws. An elegant bird made from plastic bottles with your own hands will become a worthy decoration for your site.

Grace in the garden
Another craft option based on a large plastic bottle is also practical, thanks to the ability to place flowers inside.

