The money tree is not only the most popular, but also the most effective talisman of wealth. In addition, it will decorate any interior. It’s quite easy to make a money tree with your own hands; you just need to stock up on the necessary materials, time and inspiration.
So, to make a money tree you will need:
- counterfeit banknotes of any denomination;
- foam ball of the desired diameter;
- an old unnecessary pen or Chinese food stick;
- threads;
- alabaster;
- a small flower pot or any unnecessary container;
- glue or hot glue gun;
- foamiran or any fabric;
- sisal, half beads or coins
- decorative ribbon or any beautiful lace.
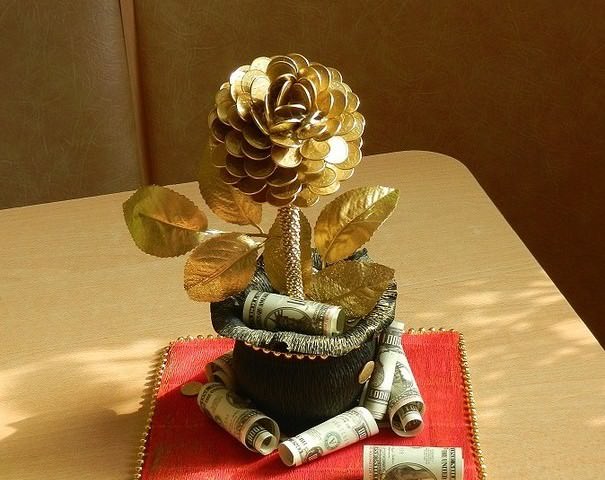
First you need to twist tubes out of money.
If small bills are used for the money tree, then you can make “bags” from them and secure them with glue.

They must be the same size. If large bills are taken to make a talisman, then they can initially be cut into smaller ones.

The number of “bags” depends on the diameter of the foam ball (when making the tree in the photo, a ball with a diameter of about 7 cm and approximately 90 twisted “bags” were used).


We make a hole in the foam ball with an old pen, then secure it in it with glue.

We have a base for a tree with a trunk.

We take a skein of thread and tightly wrap the handle, in some places we secure it with glue so that it does not unravel.

We begin to glue rolled up bills onto the top of the foam ball.

You should try to place the “bags” as close to each other as possible so that there are no gaps.


After the entire ball is pasted over, we spread the alabaster.

We transfer the finished mixture into a flower pot or any unnecessary container (for the money tree in the photo a cut-off bottle of shower gel was used), place the tree trunk there, fix it in the desired position and wait for it to harden completely (you can change the steps as desired: first pour the barrel in alabaster, and then stick banknotes onto the foam ball).

After the alabaster has hardened, you can decorate the pot in which the tree will stand. Alabaster can be laid on top with sisal, half beads, or, for example, covered with coins.
They will still be happy to make them DIY money tree. Moreover, this beautiful craft will serve as a wonderful decoration for the interior and, with practice, you can easily make a wonderful gift for your friends and family, giving them either a topiary with banknotes, or a tree whose branches are hung with jingling lucky coins. Our master classes today will tell you five different options for constructing such crafts.
DIY money tree made from coins
Manufacturing process DIY money tree made from coins, which we will consider first, can be called a classic of such bonsai crafts, both bringing financial well-being and decorating the interior. But, despite the elegant and expensive appearance of the craft, we will use simple and accessible materials for the process. What you will need to buy specifically for these are souvenir Chinese coins with a characteristic square hole inside. This is what we will use to decorate the wire branches.
You need to tie pieces of wire (copper, with a standard diameter of 0.3 mm) to a coin, and you don’t have to worry too much about the same length for all the pieces, it’s okay if some are longer and others are shorter, in any case it will even out in progress. To form the branches, we need to sequentially connect five pieces of wire with coins screwed to them. Focus on the photographs that show the process of creating something similar. DIY money tree step by step. When you have managed to weave all the coins together (50 pieces were used in our master class) into a dozen branches, you can start decorating them. Thin wire is good for working with square coin holes, but it will not be able to properly support the weight of all five coins at once, so each branch must be strengthened with an additional piece of wire at the base; for this purpose, take material one millimeter thick, fold it in half and this width should be enough for strengthening. We wrap everything together with dark floral tape and connect it into a single trunk. If necessary, we also add thickness to it using copper wire.

The second stage is to form the tree, because now you need to decorate it, create a stand for it. This stage can take up to half an hour, because we will be plastering the base. To do this, make a solution of alabaster, cement and sand, dilute it with water and pour the resulting mixture into a plastic box of a suitable shape, immerse the wire barrel inside and fix it until the mixture begins to set. After 20-30 minutes, remove and begin to shape the trunk. It needs to be given additional volume, for this again take alabaster, plaster, which is used for cement, dilute it with PVA construction glue (or office glue diluted with water), apply this mixture to the trunk, scratching grooves with the material at hand.

Painting can be multi-layered: a layer of bronze paint, a layer of gold paint, acrylic varnish + glitter. You can proudly give the finished product to your friends, telling how powerful it is as a magnet for money, adding other knowledge, for example, about.
DIY money tree: master class
If you weren’t able to buy Chinese coins, and a lot of unnecessary little things have accumulated in your household, then you can use them to make an excellent DIY money tree. Master Class, which we will look at, is precisely distinguished by the use of real, circulating coins, combined with beautiful, delicate beaded leaves. Creating bead weaving is much more difficult than weaving several dozen leaves according to a standard pattern, using thin wire as a basis for weaving.

Your blanks should be such leaves on legs, and coins of different denominations, the wire on which is fixed in a small drilled hole in the upper part. Drilling metal will be somewhat more difficult than when doing it, but here we are talking, rather, about dexterity and the presence of a special thin drill for metal. If no one in your family can dare to do such delicate work, then simply make loops on the wire pieces and glue them to the back of the coins. This is exactly what was done in our case. Again, as in the previous example DIY money tree made from coins, master- the class of which we examined earlier, the assembled barrel needs to be further strengthened by using a thicker, but still quite flexible wire. We thicken the trunk, together with decoration, with a plaster bandage, which is very convenient to wrap from top to bottom, or with its more modern analogue - floral tape.

We insert the base into a glass with unhardened plaster or finishing plaster, since we will not remove the craft after hardening, then initially it is worth choosing a glass that is both elegant and, at the same time, one that you don’t mind. It is convenient to use this method, since it allows you to place additional decor on the surface of the still plastic retainer, for example, another portion of coins, beads, seashells, which, after complete drying, will be securely glued. This way of decorating the interior is an excellent replacement for "" ideas.
DIY money tree photo
The following ideas to create a great talisman are: DIY money tree, photo which you will see below with step-by-step instructions are dedicated to special trees. They do not resemble Japanese bonsai, because these are traditional European topiaries. But the use of coins and banknotes for them as the main and practically the only decoration gives us every right to call them money plants. In the end, it is only our beloved fat woman who deserves this proud title (we remembered about her when studying the issue).

Topiary number one has a classic round shape and a single trunk, a real tree of happiness and good luck. Those who are engaged in this type of crafts know that stores sell round foam plastic blanks for topiary, so as not to have to worry about creating your own. But for this job, a small foam ball (not rubber, as it will need to be pierced to install the base) will work perfectly for you. Select the center of the ball and stick one coin on it. All of them for this work must be of the same denomination, that is, the same size and appearance, this is very important for the overall effect of the finished product. Four more coins are glued slightly overlapping onto the first coin, then, in the next row, you also glue the next eight coins overlapping, moving in a checkerboard pattern. The texture and coating that appears on the ball should remind you of snake scales, or, if you like, a bump. Naturally, having crossed the equator, you will have to reduce the number of elements in the reverse order.

In the opposite center of the ball, leave an empty hole with a diameter of one coin. You will need to pierce it using scissors or a knife to insert the straight stem inside. Additionally, during installation it should be fixed with a layer of transparent silicone glue. To disguise this junction, take a piece of beautiful fabric with a suitable texture, pull it together with thread and form a skirt, which will need to be glued to the base. The other end of the trunk is inserted into a pot with filler, which should be decorated with matching fabric (golden shades). The filler can fix the craft securely (gypsum, plaster) or be temporary.
How to make a money tree with your own hands
The craft that we will consider next is similar to the previous topiary, so the first part of the master class how to make a money tree with your own hands, you can skip. The main difference is that you need to form not one ball with iridescent golden scales, but three.

Continuing the creation of an unusual triple DIY money tree, step by step master class which is in front of you, you can move from the process of decorating the balls to the stage of creating the barrel. For someone who knows how to do it, even a triple barrel will not be a problem. Each consists of three pieces of strong steel wire wrapped with tape. A decorative effect will be provided by twine, which is carefully wound in a dense layer on each trunk, but not from the beginning and not to the end. The beginning is a segment that will be inside the ball of the workpiece and there is no need for twine there and in the same way it is not needed at the ends, which will be woven into one wide trunk.

The connector can be hot glue, which must be applied both to the wire shafts themselves before insertion into the ball, and to the finished joint. If necessary, decorate it with coins or twine. In our example, we also used twine to decorate a flower pot – a topiary stand.

DIY money tree from banknotes
And the last example of topiary - DIY money tree made from banknotes. Since it is difficult to find banknotes that you wouldn’t mind using for crafts, you can get the job done using souvenir banknotes, which in appearance cannot be distinguished from real ones.

In the third example, we probably don’t need to dwell in detail on creating a ball and a leg. It is worth taking a closer look at the process of rolling banknotes. There are two main types in this craft - rolls tied with a piece of twine, and small fans for which the paper is folded like an accordion.

When you have made a sufficient amount of decor, cover the base ball with it (preliminarily paste it with several bills so that there is a single color), using hot glue. It is best to move from top to bottom, then you will calculate the amount of material correctly and maintain the shape of the ball. Additionally DIY money tree from banknotes master- the class we are considering can be decorated with souvenir coins, and with them, complete with a couple of rolls, you can decorate the top of the pot.
It looks more attractive from coins than from banknotes. It's quite easy to make if you follow the instructions. Coins can be used in a variety of ways: old and new, large and small, silver, gold and painted.
What materials will be needed for the work?
To make this product you will need the following materials:
- foam ball for the base;
- coins of any denomination and type;
- thick aluminum wire, branches, sushi sticks - for the trunk;
- ribbon for decorating the trunk;
- stand;
- gypsum;
- paints;
- glue;
- heat gun;
- decorative elements;
DIY coin topiary (video)
Topiary options
A coin topiary will be an excellent desktop decoration. The souvenir not only looks attractive, but also, according to Feng Shui, attracts wealth.
Simple topiary
- First you need to choose a base. It is usually taken as a ball of polystyrene or foam rubber, with a diameter of about 8 cm.
- Coins are attached to the ball using glue. First, one coin is glued, and then four on the sides (they should slightly overlap the first coin). The base is not completely pasted over: you need to leave room for placing it on the trunk. To make coins shine and not lose their attractiveness, they are coated with varnish.
- The barrel is inserted into the ball, and the place of their connection is treated with glue for reliable fixation. This area can then be decorated with ribbon or corrugated paper.
- The trunk is decorated with a beautiful ribbon.
- Additional decorative elements, such as bows, are glued to the ball.
- The tree is placed in a pot partially filled with plaster. You can make a pot yourself from a plastic glass, or you can buy it in a store.
- The inside of the pot is decorated with coins or artificial grass, for example.
Topiary made of coins and coffee
In this case, the product will not only look nice, but also smell delicious. The best option is the “coffee wallet”. It is prepared simply: the base ball is covered with coffee beans, and a triangle is left in one part of it to secure coins.
You can also do " ". In this case, the coins are fixed on a strong wire, depicting a stream pouring from a cup into a saucer. Coffee beans are glued onto the saucer (if you paint them to match the color of the coins, the topiary will look as elegant and rich as possible). Or you can make just a slight hint at the money theme by adding just a couple of coins.

Tree of small coins
If you want to make a topiary that looks like a real tree, you will need the following materials:
- coins;
- gypsum;
- drill;
- stone;
- paints;
- sea salt;
- newspaper;
- glue;
- pot;
- wire;
- Feng Shui money figurine.

Make a tree as follows:
- Using a drill, holes are drilled in the coins.
- The coins are laid out on newspaper and painted gold on both sides.
- They form small branches by fastening three coins with wire, and then combine them into large branches.
- A trunk is made from wire and branches are attached to it.
- Prepare a stand: pour plaster into a plastic plate and place a stone in the middle.
- The barrel and stand are painted brown.
- The entire structure is varnished.
- The crown of the tree and the stand are decorated with sea salt of any color, placed on glue.
- A Feng Shui figurine, such as a money toad, is glued onto the stand.
Other options for money topiary
Excellent obtained from a branch of corelius, which is sold in any flower shop. You can also decorate the leg of a money tree with bent coins: the work is painstaking, but such a trunk looks very impressive. For one topiary in this case you will need about 200 coins. Attach them with hot glue. To create a trunk, they also use foil and wire, plastic sticks from a flower shop, and wooden bases for brushes.
Rolled up bills placed on toothpicks are sometimes attached to the crown along with coins, folded into pounds, tubes, an accordion and a fan.
As a basis for topiary, you can take a ready-made artificial tree, the green foliage of which will go well with paper banknotes and silver coins.
The crown is sometimes decorated with beads or pistachio shells: they give the craft lightness and grace.
A variety of containers are used as stands for money trees: beautiful boxes, flower pots, cute cups or mugs, and even shells for small topiaries. The coasters are decorated with burlap and twine, decorated with beads, fabric, rhinestones, and lace. Sometimes inscriptions or ornaments are applied.
How to make topiary from coffee and coins (video)
Creating a coin topiary is a creative and fun process. An art object made with your own hands can become a decoration for any room, be it an apartment or an office.
The money theme in home decor has long been common among creative people. Money is used to make various decorations for the room. They make topiaries, panels and other interesting products. Money trees are very popular among needlewomen. You can make a money tree out of coins with your own hands from inexpensive materials that you have at home.
Topiary made of coins
Most often, such trees are made from small coins, but coins of larger denominations are also found. DIY crafts from 10-kopeck coins are not that difficult to make. Any needlewoman can make such a tree, but you need to know the sequence of work.
For manufacturing you will need the following tools and materials:
- foam ball;
- leg-split;
- stick or rod for the trunk;
- coins.
 You should start with making the barrel. It should be tied with twine. You need to make a hole in the foam ball. Insert the prepared trunk there, but do not glue it. This procedure needs to be done to make it easier to put the finished upper part on it later.
At the top of the topiary you need to glue the first coin. Subsequent ones must be glued in a circle. Around the central coin, four more should be glued on different sides. The main requirement for this process is that all the coins were the same. The next row is glued between the previous coins. The entire surface of the foam ball is gradually filled. When this work is completed, you need to put the ball on the leg. The hole must be filled with hot glue and the barrel must be glued to the ball.
Next you need to secure the entire structure in the pot. To do this, you need to dilute alabaster and pour it into a pot. The barrel is installed in the center. A prerequisite must be an even position of the trunk. Otherwise, the weight of the topiary on the surface will be incorrectly distributed. The entire product will be unstable. All that remains is to glue the additional decor and you can consider the work of creating a topiary from coins completed.
In order to diversify the options for such a product, you can use coffee. Coffee beans are glued on the surface of the ball, and coins are glued only on one side. There is a lock around them, which is also glued to the base.
This topiary looks very unusual.
Other examples of work
In addition to topiary, you can make other, quite interesting products. These include panels and various interior decor. You can depict anything on a panel. It could be a tree whose crown consists of coins. Or an image of a Goldfish consisting of pennies.
To make penny wood for the wall you will need the following materials:
- base for panels;
- putty or glue;
- clay for creativity or twine;
- coins;
- PVA glue and hot melt glue;
- acrylic paint and varnish;
- palette knife;
- sponge.
You can use fiberboard or chipboard as a base. If the coins will stick, then thick cardboard will do. In the case of putty, cardboard cannot be used. It becomes deformed from exposure to moisture.

The base must be covered with soft paper. White toilet paper or paper towels are suitable for this. You need to take a piece of paper and place it on the base using PVA glue. This is done to create a textured surface. If such a surface is not needed, then the base can be left flat.
Shaping the trunk
 The trunk can be made in three ways. It is made from twine, paper or clay. In the case of twine, it is necessary to glue pieces of this material with glue. The more pieces are glued, the thicker the trunk will be. You need to shape it to your taste. Add bends and various branches as your imagination dictates.
If you use paper for this, the trunk is formed from thin strands. In order to make them, you need to twist a piece of paper with your fingers. When a large number of such bundles have been made, you can begin gluing. They only need to be attached with PVA glue. It is necessary that the paper is completely saturated with glue.
Another way to form a crown is with ornamental clay, which is sold in craft stores. It can make excellent branches and trunk. It also needs to be glued using PVA glue. It must become one with the base.
Making a crown
 There are also two ways to form a crown. One of them is gluing with hot glue. Another method is to use putty. Which method to choose depends on what is available.
Coins should be glued according to a specific plan. Each coin must be in its place. The crown should have branches and shape. In order not to make a mistake with this, it is better to have a ready-made option before your eyes. If you use putty, you need to apply it carefully so as not to stain the base. To do this, you can use a palette knife.
When the crown formation work is completed, the product must be left to dry. In the case of hot melt adhesive this is not required. Before painting the work, all parts must adhere well to the base.
Product tinting
Metallic acrylic paint is suitable for tinting. Dark paint is first applied to the surface of the panel. It may be black or brown. The entire product is coated with paint. Then, using a sponge, you need to highlight individual convex areas. To do this, take a little gold or bronze paint and apply it to a sponge. Before painting, you need to make several impressions on another surface so that there is not too much paint on the sponge.
Next, carefully walk over the surface with a sponge. It is not necessary to paint over a continuous layer. It is necessary to highlight only some parts and place accents. After applying this type of paint, the panel will gain volume and sparkle with new colors.
Finally, acrylic varnish should be applied to the surface. It is best in this case to use varnish in a can. It does not have a strong odor and spreads well over the surface.
Registration of work
You should also take care of the frame for the panel. You can buy it in a store and simply glue it on top. This must be taken into account when choosing a base for the panel. The base size should be standard. The frame is selected to the desired size. In the case of a base that has a non-standard size, you will have to make the frame yourself. It can be made of wood or glued together from cardboard. In the future, it is decorated according to preferences.
Attention, TODAY only!
You can attract wealth and prosperity into your life not only with the help of rituals. In everyday life, we are surrounded by seemingly ordinary things and objects that activate monetary energy and help us get rich. For example, according to the teachings of Feng Shui, an ordinary indoor fat plant - the money tree - provides invaluable help in this.
This modest plant, like a magnet, attracts wealth into the house. In addition to the Crassula, there are other indoor flowers that can attract cash flow, for example, cyclamen and arrowroot. They are united by common features, namely, round leaves resembling coins - a symbol of wealth and well-being.
According to Feng Shui, an artificial analogue can also become a strong activator of financial well-being. For this reason, you can choose a decorative money tree made from coins, stones, beads or other materials.
Which money tree is best according to Feng Shui?
When choosing a money talisman for your home, you should remember that a real tree is more effective than an artificial one. For a person who does not want to worry or waste time caring for a flower, a symbolic figurine of a tree is more suitable. Such a talisman will not dry out or die.

A real living money tree can wither and shed its leaves due to improper care. This sign indicates upcoming large expenses and a possible period of lack of money. Therefore, it is very important that the fat woman feels good. The best option is to acquire trees of both types - an indoor plant and an artificial analogue.
You can make an artificial money tree with your own hands or purchase it in a store or market. At the same time, you should remember that you cannot keep them in the same room - you should distribute money talismans to different rooms. You also need to keep in mind that a money tree made from coins, made independently, has stronger energy.
Sometimes the talisman is made in the form of a money tree made from large denomination bills. Such a product can be presented to the hero of the day or a close relative for his birthday. The gift symbolizes prosperity and success. Below you can find a master class on making a decorative money tree from coins, various materials and banknotes.
A well-groomed fat woman is the key to financial well-being
An artificial tree with pebbles instead of leaves or a money tree made of beads can be purchased at a Feng Shui store. It perfectly attracts wealth and does not deteriorate over time. You just need to make sure that it is positioned correctly. But a living indoor tree requires special care. Its leaves should not become covered with dust, turn yellow or fall off. Otherwise, the preconditions for ruin will be created. This plant should not dry out, so as not to provoke huge waste of its owner.

At the bottom of the pot where the tree of wealth grows there should be five coins of the state in whose territory you currently live. This will ensure a constant increase in your material well-being. You will have promising acquaintances, favorable circumstances and new sources of income. At Christmas, the coins must be removed and washed in running water. This is done to update the energy of the talisman and.
Master class - how to make a money tree from coins with your own hands (video):
Another video on making a money tree from coins
Where is the best place to place a money tree?
A money tree made of coins, just like a plant, is endowed with a special meaning, and therefore it needs a special place. According to Feng Shui, the tree of luck should be located in the southeastern sector of the house, that is, in the wealth zone. An excellent place for this talisman is the hallway - in this room the path to cash flow will be best opened. To enhance the effect, place a large banknote under the tree.
