The veranda allows you to profitably expand the useful space of a residential building. In a properly constructed and well-equipped extension, you can comfortably spend time both in the warm and cold seasons.

It is best to build the extension so that it covers the entrance door to the main house. Therefore, you will not be able to build a veranda on any desired side of the already finished main building. Otherwise, the veranda will be separated from the main building and you will have to enter it from across the street.

The dimensions of the extension are selected individually. For a family of 3-6 people, a veranda measuring 3x4 m is enough. It is also important to take into account the general view from the street. For example, if you live in a large two- or even three-story house, and the veranda is very small, the overall architectural ensemble will turn out to be inharmonious. For compact houses, you can safely add verandas the width of the entire wall of the main building - it looks great.

Important note! Regardless of the chosen dimensions and the overall features of the extension, its construction must first be legalized. To do this, you must have a project on hand. You can find it in open sources or order it from a specialized company.
Take your project to your local architectural department. Department employees will study your project, make the necessary changes and issue a permit. Keep in mind that on average it takes about 2-3 months to review and approve a project, so it is best to resolve this issue in the winter, before the start of the construction season.


Construction site marking
We are starting to prepare our construction site.
First step. We remove about 150 mm of the top layer of soil from the perimeter of the future building and take it to the flower beds, vegetable garden or other place.
Second step. Align the resulting depression.
Third step. We carry out the markings. First, focusing on the project, we drive in metal or wooden pins at the corners of the site, then in the same way we drive in intermediate pegs every 1-1.5 m, and then we pull a rope between the pins. We will use it to guide us in the process of arranging the foundation.
Making the foundation
Most often, verandas are built on columnar or strip type foundations. The depth of the support is assumed to be equal to the depth of the foundation of the main house. It is strongly not recommended to connect the main support to the foundation of the extension, because these structures will have widely varying weights. Consequently, the degree of their shrinkage will also vary. To prevent a heavy house from dragging down a relatively light extension, the latter must be built on a separate foundation. To do this, leave approximately a 3-4 cm gap between the foundations.
Important point! When choosing the type of foundation, consider, first of all, the soil characteristics in your region and the total mass of the veranda. For the construction of heavy structures on heaving soils, monolithic ones are best suited. Lightweight structures, for example, made of wood, can be built on columnar supports.
Tape base
A strip-type foundation is optimally suited for the further construction of a veranda on it from building blocks or bricks. The thickness of the base, as already noted, is maintained equal to the thickness of the foundation of the house. If this is a new building, keep the thickness at 70-80 cm.
First step. We dig a trench around the perimeter of the walls of the extension.

Second step. We level the bottom and walls of the trench using wooden boards or panels to the height of the future concrete support.
Third step. We successively fill the bottom of the trench with a 10-centimeter layer of sand and the same layer of crushed stone, making sure to compact each ball of backfill.
Fourth step. We lay a reinforcing mesh of 10-12 mm bars. The recommended mesh size is 10x10 cm. This way the base will be as strong as possible.
Fifth step. We pour concrete prepared from a portion of cement, three portions of sand, 4-5 portions of crushed stone and water.
Carefully level the fill and leave it to dry and gain strength for 3-4 weeks. In hot weather, we pour concrete every day to prevent it from cracking.

Columnar base
Perfect for a veranda made of timber or polycarbonate. It is recommended to make holes for posts with a depth of 80-110 cm. If the veranda is small (up to about 3x4 m), it will be enough to install supports in the corners. However, professional builders recommend installing intermediate posts for any size veranda. We maintain the distance between supports within 0.8-1 m.

First step. We dig holes in the places where the pillars will be poured. The most convenient way to do this is with a drill.
Second step. We fill the bottom of each depression with a 15-20 cm layer of sand. Additionally, it is recommended to pour approximately 10 cm of crushed stone. We compact each layer.
Third step. Pour the concrete to the ground level and let it harden.
Fourth step. We coat the finished concrete supports with bitumen.
Fifth step. We fill the gaps between the ground and the supports with sand.

Sixth step. We erect the above-ground part of the pillars from brick. We make the height equal to the height of the foundation of the main house.


Making a subfloor
The floor can be wooden or concrete. For example, in a frame veranda made of wooden beams, a wooden floor would be more appropriate. Concrete pouring will best fit into a brick extension.

We make a wooden subfloor like this:
- We fix the beam of the lower trim on the foundation. We use suitable fasteners, for example, anchors. To connect the beams directly, we first make samples at the places of their joints and additionally fasten them with galvanized nails;
- We attach wooden logs to the bottom trim. We keep the step at 50 cm - this way the floor will definitely not fall through. We use the connection option described above;
- fill the space between the joists with expanded clay;
- We make the flooring from unedged boards or plywood about 50 mm thick. We attach the flooring elements to the joists with galvanized nails or self-tapping screws.
We make a concrete screed like this:
- fill the base with a 10-centimeter layer of sand;
- pour a layer on top;
- lay the reinforcing mesh. For the floor of the veranda, a mesh of rods with a diameter of 6-8 mm with cells of 25x25 cm is sufficient;
- pour concrete.
Important! The screed should be as even as possible. We carry out the work with the obligatory use of a level.
Building a wooden veranda
Basic properties of the material
Wood is one of the most popular and ancient building materials. Even after the appearance on the market of all kinds of blocks and other low-cost and easy-to-arrange elements, wood practically did not lose ground.
Almost anyone can handle the construction of a simple frame wooden veranda. You just need to properly mount the frame posts and cover them with shields, clapboard or other suitable material.
The undeniable advantages of wood are its environmental friendliness, beautiful appearance and relatively low weight. The latter property allows you to abandon the construction of expensive and difficult to construct foundations.
The main disadvantage of a wooden veranda is its fire hazard - installing a barbecue in such an extension or in the immediate vicinity of it is a very important undertaking that requires taking into account many nuances and details. Therefore, it is better to move the source of fire somewhere further outside the wooden veranda.
Another significant disadvantage of wood is its poor tolerance to high humidity, which is why the material requires serious pre-treatment with special ones. Without such preparation, the wood will rot very quickly.
Construction order

To build the frame, we use high-quality wooden beams with a cross-section of 100x100 mm. We already have the bottom trim and subfloor, so we continue to work, adhering to the instructions below.


First step. We cut grooves in the beam of the lower trim for installing vertical supports. We maintain a half-meter step.
Second step. We install vertical racks. To fasten the frame elements we use staples and screws or nails.

Important! The roof of our veranda, as noted, will be sloping. Therefore, we make the vertical beam installed at the bottom point of the slope 50 cm below the opposite posts.


Third step. We mount the beam of the upper trim. On higher racks no questions will arise - we perform the connections in exactly the same way as in the previous stages.
When installing the strapping of lower supports, we do the following: first we connect the pillars longitudinally with a strapping beam, and then we fix the transverse crossbars connecting the high and low posts at the height of the low posts. We fasten the crossbars to the high posts using pre-created samples and nails.
Fourth step. The top trim is ready. The resulting slope will allow us to lay the rafters for the roof. Additionally, we nail a girder near the roof slope. To fasten the beam to all supports, we use anchor bolts. For greater reliability, it is recommended to fasten the strapping beams with transverse boards or beams, if possible and necessary (we focus on the weight of the future roofing material). We will attach racks and struts to them for greater strength of the rafter system.
Fifth step. We install in increments of 50 cm. For this we use a wooden beam with a section of 100x200 mm. We connect structural elements using any of the previously discussed methods.


Sixth step. We cover the frame. Lining is perfect for interior cladding, and siding or other material for exterior cladding. We lay layers of hydro- and thermal insulation between the external and internal cladding materials. We attach the film to the frame. The position of the insulation is fixed by transverse slats. The finishing material is also attached to them. When covering, do not forget to leave openings for windows and doors.


Prices for various types of timber
Brick verandas
Basic information about building materials
Brick is excellent for constructing permanent verandas. A building made from this material will be cool in the summer and, provided the insulation is properly insulated, warm in the winter. Brickwork is durable, fireproof and easy to maintain.
The main disadvantage of a brick building is its heavy weight. Such structures are built exclusively on , which does not have the best effect on the total cost of construction.
The procedure for constructing a veranda
The foundation is ready and waterproofed, the screed is poured, the base is level and does not require any additional preparatory measures. Let's start laying out the walls.

We first select the appropriate type of masonry. The simplest options, perfect for constructing a veranda yourself, are as follows:
- spoon masonry. The final wall thickness will be 120 mm;
- bonded masonry. Wall thickness – 250 mm;
- chain laying. Allows you to obtain walls with a thickness of 380 mm.
First step. We attach a mooring cord to two opposite ends of the foundation with a tie. It should run along the edge of the base.
Second step. We place the corner bricks along the cord, and then fill the space between them in accordance with the chosen masonry method. To fasten building elements we use standard cement mortar.

Third step. We check the evenness of the first row and similarly lay out the walls to the required height, not forgetting to leave openings for doors and windows.
Important! will be inclined, so we make the wall at the bottom of the slope, as well as the side walls adjacent to it, a row lower compared to the wall supporting the top of the roof.
Having laid out the last row of walls, we arrange an armored belt. To do this, we fix formwork about 70 mm high on each wall along the upper surface of the walls, place anchor bolts in the corners, lay reinforcing bars and pour concrete.
We let the concrete harden, and then attach a strapping of wooden beams with a section of 10x10 cm to the anchor bolts. The further procedure for arranging the rafter system remains similar to the situation with
If the veranda is planned to be used throughout the year, the walls can be laid in two rows, filling the gap between the rows with thermal insulation material. With single masonry, insulation, moisture insulation and interior finishing are carried out by analogy with a wooden veranda. Exterior decoration is at your discretion. You can simply carefully unstitch the seams and call it a day.


| Masonry size | Length, L | Width, V | Height, N | Number of bricks excluding thickness mortar joint, PC. | Number of bricks taking into account thickness mortar joint 10 mm, PC. |
|---|---|---|---|---|---|
| 1 m3 single brick masonry | 250 | 120 | 65 | 512 | 394 |
| 1 m3 thickened brick masonry | 250 | 120 | 88 | 378 | 302 |
| 250 | 120 | 65 | 61 | 51 | |
| 1 sq. m of masonry in half a brick (masonry thickness 120 mm) | 250 | 120 | 88 | 45 | 39 |
| 1 sq. m of masonry in one brick (masonry thickness 250 mm) | 250 | 120 | 65 | 128 | 102 |
| 250 | 120 | 65 | 189 | 153 | |
| 1 sq. m of masonry of one and a half bricks (masonry thickness 380 mm) | 250 | 120 | 88 | 140 | 117 |
| 250 | 120 | 65 | 256 | 204 | |
| 1 sq. m of masonry in two bricks (masonry thickness 510 mm) | 250 | 120 | 88 | 190 | 156 |
| | 250 | 250 | 65 | 317 | 255 |
| 1 sq. m of masonry in two and a half bricks (masonry thickness 640 mm) | 250 | 250 | 88 | 235 | 195 |
Prices for construction and facing bricks
Construction and facing bricks
Making a veranda roof
And the rafters are installed. All that remains is to make the sheathing, install the insulating layers and lay the finishing roofing material.
The lathing can be solid (for rolled materials) and sparse (for sheet roofing). We make continuous sheathing from OSB boards. To do this, we attach them to the rafters with a 1-centimeter gap. We fasten the sparse sheathing beams at a pitch recommended by the manufacturer of the selected roofing material. On average, it is 30-35 cm. To attach the sheathing to the rafters, we use galvanized nails or self-tapping screws.
We fill the cells between the sheathing beams with mineral wool for thermal insulation. We lay a waterproofing film on top and attach it to the sheathing using a stapler with staples. In the case of arranging a continuous sheathing, we fix the thermal insulation from the inside of the room. We secure the insulation boards using transverse slats, nailing them to the sheathing.
Finally, all that remains is to mount. It is better that it matches the roof covering of the main house. For the rest, we focus on our preferences and available budget.


Finishing the floor
If the subfloor is wooden, we lay insulation in the space between them and fill the flooring from edged boards to the joists. We paint and varnish the boards.
You can also install a boardwalk on top of the concrete screed, similar to the previous method, or lay another material of your choice, for example, linoleum.


Finally, all that remains is the doors, furnishing at your discretion and connecting lighting if necessary. We won't pull the wiring. It is enough to remove the extension cord from the house and turn on the necessary lighting fixtures.

Good luck!
Video - DIY veranda
On many dachas and cottages you can now see terraces. Indeed, this extension has long ceased to be considered a sign of luxury and has become affordable. The veranda is a great place for intimate conversations, evening or morning tea. How nice it is to spend a quiet summer night outdoors! It is this design that makes the appearance of the garden and site completely complete. In this article we will tell you how to make a terrace with your own hands at the dacha, give step-by-step instructions, and also show drawings, photos and video materials.

The terrace can be a large porch located next to the entrance to a country house, adjacent to one of its side walls, or even to the second floor. At the same time, the terrace at the dacha must be connected to one or more of the rooms of the house. The nuances of structures that perform an enclosing function depend on the climate and terrain.
If you are thinking of building a terrace yourself in the central region of our country, then you cannot do without arranging a roof and strong side fences. A veranda built in southern regions can have a completely open structure and be fenced only with railings. However, in order not to suffer from the scorching sun, you should take care of building a light roof on such a terrace, on which to place climbing plants that will hide you from the sun. If only local sun protection is required, small portable umbrellas or awnings can be used. Interestingly, the roof on the terrace can be built either separately or jointly with the main roof of the house.

Before you build a terrace, you need to decide on its size and area. To do this, evaluate the space available on your site, as well as your financial reserves. If funds are limited, then it is worth saving by reducing the area of the future terrace. There is no point in saving money by purchasing inferior quality materials or simplifying the design. If after some time your financial condition improves, then it will be possible to increase the area of the terrace, since current technologies fully allow this. Thus, the first stage of terrace construction can be called laying the foundation, which can subsequently be improved and modified.
Evaluate the factors of external influences. You should not place the structure in a place poorly protected from the wind; make sure that there is a beautiful view from the terrace so that children can play on it safely and calmly.

When building a terrace, you have to choose from various building materials: metal, concrete, stone, brick. Perhaps, natural wood is best suited for this design, since you do not have to deal with heavy work, perform solid foundation masonry, subsequently the terrace can easily be expanded to the required area, and its structural elements can be given quite complex shapes.
The environmental safety of wood should not be overlooked. Of course, many may complain about the “fragility” of wood. In fact, such statements can be explained solely by ignorance of the characteristics of wood and a lack of understanding of its properties. If you choose the right type of wood and do not skimp on various processing compounds, you will not experience problems when using the terrace or spend too much effort on caring for it.
Proper processing will allow you not to worry about even a wooden terrace catching fire; it will be possible to cook a barbecue on it: accidentally falling coals will not lead to fatal consequences. Of course, such resistance of wood to fire will not save you from a fire caused by accumulations of garbage on the terrace. Thus, the cleanliness of the veranda is no less a guarantee of safety than appropriate treatment.

You can build a wooden terrace yourself. This material is most often used for this purpose. For example, a brick or stone heats up in the sun and increases the temperature, but, on the other hand, this material is much stronger. But if the issue is price, then wood is the undisputed leader, especially if you have a lot of leftovers left after other construction processes. So, to build a wooden terrace, you will need the following set of tools and materials:
- roulette;
- drill;
- jigsaw;
- screwdriver;
- level;
- chisel;
- hammer;
- pencil;
- shovels;
- staples;
- brushes;
- cement;
- wooden boards;
- metal and stone blanks;
- antiseptic;
- dye.

The extension to the house should be located at a height of approximately 30–40 cm from the ground.
The principle of constructing a wooden terrace is expressed in the following sequential stages:
- First, mark the site. Drive in pegs along the intended perimeter and pull the rope. It is also necessary to install additional supports in the corners, and put side logs on them.
- Using a level, level the horizontal. Place temporary supports on the desired side. But keep in mind that the joists should have a slope of up to 2° from the house. This will prevent water from retaining on the base.
- Now you should align the cord along the top edge of the joist and securely fix it to the peg. After this, you can remove the logs and begin making the base.
- Cement pillars must be built at the corners of the future structure. The height should be equal to the height of the temporary supports on which you laid the joists.
- It is necessary to dig a trench between the posts and fill it with cement mortar, having previously installed curbs.
Instead of installing a curb, you can use strip foundation technology, which is discussed in this article - Making a strip foundation.
As for the internal space of the building, it can be covered with crushed stone or a drainage system can be made. When building a foundation, be sure to connect it to the house. To do this, drill holes in the foundation of the house at the junction points and drive reinforcement into them.

When the base is ready, you can begin the direct installation of the wooden structure, and this process looks like this:
- Place logs on posts and curbs and secure them.
- Next, mark the places where the bars are attached.
- Having laid out the beams, fasten them with corners with lags.
- Now it's time to lay down the boards. An excellent option for this would be deciduous wood. A board of 20–35×100–150 mm is suitable for this purpose. When laying boards, be sure to leave small gaps for ventilation.
- To finish laying the flooring, use a jigsaw to smooth out the edges of the area.
- The very last step will be varnishing and painting.
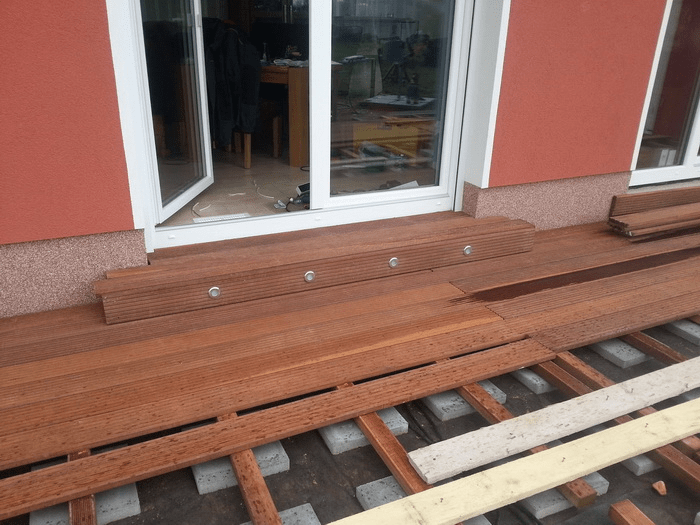
Often decking is laid on a wooden base. In this case, installation should begin from the wall of the house, making an indentation of 10 mm.

As for the further arrangement of the terrace, everything will depend on the method of its use. For example, you can additionally build:
- Roofing.
- Fencing.
- Pergolas.
- Railing.
- Swings and stuff.
All this will make using the terrace comfortable. Of course, the roof for a house extension is considered the most important structure. It is very beautiful and original when it is made of the same material as the base, and in our case, wood. Having made the roof structure, it can be covered with various building materials, for example, polycarbonate, slate, tiles, etc. To do this, you will need to build additional supports for the roof.
If you plan to use the terrace only in the summer, the roof can be removable or have an automatic opening mechanism.

If you decide to build a polycarbonate veranda, then you will need to familiarize yourself with a different construction technology. First, it is worth noting that polycarbonate has many positive aspects, including strength, flexibility, ease of assembly, fire resistance, and so on.
Depending on what kind of terrace you want to build, closed or open, this material can be mounted both vertically and horizontally. However, in both the first and second cases, it will be necessary to make a frame from a profile or beams.

If you decide to build an open terrace to your house, then you only need to install the roof sheathing. If it is a closed type, then the lathing is also made for the walls. In this case, the following parameters should be observed:
- The distance between support pillars should be from 1 to 3 m.
- The distance between the sheathing beams is from 80 to 100 cm.

Installation of polycarbonate is carried out using the “dry” or “wet” method. If the panel is honeycomb, then holes are made in it for fastenings in increments of 30–40 cm. Considering the fact that polycarbonate changes its volume under the influence of temperatures, its fixation is not tight. The process of laying panels follows the following instructions:
- Installation must begin on the left side of the roof. When joining sheets together, leave a small gap of up to 5 mm. If the panel you are using is cellular, then place them vertically so that the condensation accumulated inside can be easily removed.
- To prevent debris and moisture from getting inside the sheet, the panel is insulated with a solid tape and a strip at the upper end part, and a perforated tape is used at the bottom through which condensate will drain.
- Fastening is carried out using stainless steel self-tapping screws with the obligatory use of washers. If the frame is metal, then use thermal washers that are similar in color or transparent.
- Each joint formed between the sheets must be sealed or covered with decorative strips.
This is the technology used to install a polycarbonate terrace to the house. By following simple tips and recommendations, we are confident that you will cope with the task set before you. Also, in addition to all that has been said, we recommend that you familiarize yourself with the video and drawings of the terrace design.
The construction of a wooden terrace begins with design, during which it is important to determine the desired direction of the boards, the method of attaching them to the joists, and select the material required for flooring and moisture insulation. Before making a wooden terrace, read the recommendations of specialists, purchase the necessary material and tools - only after that you can begin work.
A terrace in the form of a simple deck can be made of different materials - brick, stone, concrete, ceramic tiles, metal or wood. DIY wooden terraces are becoming increasingly popular due to a number of their advantages:
- smaller volume of preparatory excavation work;
- small volume of concreting;
- less labor-intensive work,
- ease of creating several levels, arranging stairs and installing additional elements (railings, balustrades, gazebos and verandas);
- ease of modification and expansion;
- a DIY wooden terrace is convenient for creating curved and complex structural shapes, which makes it easy to fit them into the existing space;
- the ability to create a surface that is pleasant to walk on and on which you can sit and lie directly, which can be especially important for children.


Look at the photo: wooden terraces can be of various designs, the main thing is that they fit organically into the overall composition.
Design for the construction of a wooden terrace
Before you make a wooden terrace, you need to create a project. The most important task that must be solved at the design stage is ensuring the durability of structures. This is especially true when wood is used as the main material. The most dangerous destructive factor for it is humidity.


Therefore, when constructing wooden terraces, one of the main tasks is to exclude non-drying areas - “water traps”. You should also know that the ends of the boards require special protection, since it is through cuts across the grain that wood absorbs moisture most intensively. Before building a wooden terrace, you need to avoid direct contact with surfaces that can absorb water (concrete or porous stone). In this case, the wood should be insulated either with waterproof films or with an air gap. In any case, the best way to combat excess moisture when building a terrace to a wooden house is to have good ventilation of the wood.


When designing a terrace with a wooden covering, first determine the direction of the boards. For a square terrace, from a technical point of view, both directions of the boards are equivalent. But with a long and narrow board, the transverse direction is preferable, which will allow you to use boards of the same length without merging them end to end.


As you can see in the photo, a wooden terrace to a house covered in the transverse direction looks more spacious, and the joints between the boards are less noticeable. The transverse arrangement of the boards also makes it easier to design the bends of the terrace - both smooth and angular. In any case, when building a terrace to a wooden house with your own hands, the location of the beams of the supporting structure depends on the location of the boards.
How to make a wooden terrace for a house (with photo)
Terrace boards are usually made with a thickness of 25 to 50 mm. To relieve stress during changes in temperature and humidity, small compensation grooves are usually made on the back side of such a board along its entire length.


Attaching boards to joists can be done either openly or hidden. In the first case, the board is fastened using self-tapping screws with an anti-corrosion coating on both edges. In this case, it is necessary to pre-drill a hole in the flooring boards to avoid cracks. The screw head is left visible or recessed and covered with tinted grout or a uniform chip.


A hidden method of attaching boards to joists involves the use of special fasteners. The basic principle of such fastening is to connect the boards using a plate or a special clamp (clip) made of a corrosion-resistant and durable material (stainless steel, composite material) and secure the fastening to the joist with a screw with a diameter of 3.5-4 mm. For such a connection, a cut with a certain width and depth (depending on the type of clamp design) is required on the side of both boards at the place of fastening.


There is a method of hidden fastening that does not require a side cut - using a special fastening element such as nails, or nails. It is virtually invisible from the front side of the terrace, suitable for decking of various thicknesses, easy to install and durable.


Terrace flooring laid using GvozDESK type elements has an ideal appearance and is resistant to any load. Due to the high-quality zinc coating, the element is not subject to corrosion and, therefore, has a long service life. It is easy to use, since installation of terrace flooring requires only a hammer and a screwdriver. Nail-fastened decking can be re-sanded after long-term use.
A variation of the nail-type element is a reinforced key-type mounting fastener, which has notches and a limiter that provides the required technological gap between the boards (4-8 mm).
Terraces to a wooden house and their photos


Pay attention to the photo: Wooden terraces look especially good on slopes, where they can be used to create a significant usable area without the large-scale excavation work that a conventional terrace would require. We should not forget about the traditional use of wood near bodies of water, because when leaving the pool, it is much more pleasant to feel wood than stone or iron. The main problems associated with the use of wood very often arise due to insufficient understanding of the properties of this material, as well as as a result of unprofessional design.
We should not forget about the environmental benefits of wood. It is not only harmless to humans, but also a naturally renewable material. Wood for terrace construction must be protected from bacteria and fungi that cause it to rot, as well as from insects. Some products designed to protect wood prevent the appearance of moss and algae. They should be used to treat the floor boards on the terrace. Alkyd and oil-based preparations are suitable to protect wood. It is not recommended to use water-soluble impregnations - they are washed out by rainwater. Many impregnations are presented in a different color palette. They serve not only for protection, but also for the wood of the desired color.
Wooden deck flooring
One of the best materials for terrace flooring today is considered to be a polymer board made from a wood-polymer composite (decking). The word “decking” comes from the English word “decking” - wooden (deck) covering, flooring or wooden terrace. It also has other meanings not related to construction. In Russian, this word is often used to refer to garden parquet.


Look at the photo: A terrace for a house made of wood with a decking floor combines the natural beauty of wood and the strength of plastic. This material is excellent for outdoor use. Its composition is a ratio of high-quality crushed wood (60%) and polymers (40%). The physical characteristics of both materials are optimally combined, providing truly unlimited scope for the use of this composite.
The polymer board retains its shape regardless of operating conditions and is not subject to warping even when actively exposed to sea or rain water. This material is environmentally friendly and does not contain toxic substances or hazardous impurities. The decking has an even color regardless of the geometric parameters, which will allow you to create a single design style of any size.


It is equipped with special locks, which greatly simplify its installation and provide a durable coating that can withstand loads of up to 1000 kg/m2.
Arranging terraces next to the house is considered by many people as a very attractive design solution. But, as with any type of construction work, there are subtleties that must be taken into account. If you do this, building a great-looking structure turns out to be quite simple and accessible to almost anyone who knows how to work with tools. It is not necessary to invite professional builders for this.


Types of structures
Strictly speaking, terraces are only open (this is the interpretation given in SNiP), and all closed extensions to houses, no matter how they look externally, should be called verandas. The semi-open type - without walls or equipped with low walls - has sufficient space, and a roof or canopy will help to avoid the effects of precipitation and sunlight. But all the same, the furniture will have to be placed as far as possible from open areas.


A pergola-style terrace is ideal for dry areas, and it is not at all necessary that the structure be covered with vine shoots. After all, metal gratings with dense weaving are considered self-sufficient and allow you to decorate the space both from above and from the edges. Provides simultaneous closure from outside observation in harmonious sunlight.


When you want to get the visual effect of graceful leaves, but don't wait until the pergola is covered in vines and don't care for them, you need to reproduce the appearance through carving. But you can make the external grille very rare, only hinting at the developers’ intentions. An exotic variety is a terrace on the roof. This is much more spacious than a simple balcony, and a supporting wall is almost never used, only a fence. There will be no talk about this option, but it is worth considering its existence.
The wooden type of terraces is actually not the same. Differences may appear in the size, shape, number of levels of the structure, the possibility of free access to the structure or its fencing with decorative plantings.


Project: dimensions and shape
The selection of size and configuration is determined by the size of the plot and the house built on it. Tiny terraces adjacent to a large building are perceived as aesthetically unnatural. Extension less than 4 sq.m. m is uncomfortable, and no methods will help correct the situation. The project should include a minimum consumption of concrete and ceramic slabs, as this will reduce the labor intensity of the work. It is best to make terraces rectangular in order to combine the lines of the buildings with each other.


Important: tiles are better laid on a rectangular terrace, and wooden flooring allows you to vary a variety of shapes through the use of electric jigsaws. But again, it is necessary to maintain visual consistency between the configuration of the extension and the main part of the house.


Terraces with barbecues are considered one of the best design solutions. It should be taken into account that stoves can be very heavy and large structures, which is why it is necessary to build a foundation, possibly for the terrace as a whole. We will also have to make a good, uninterrupted drainage system. The work associated with its arrangement is quite labor-intensive and can significantly increase the overall cost of construction. The screed must be reinforced, and the foundation must be strictly in the form of a monolithic slab.


The grillage is not made of concrete; this type of structure would be unnecessarily difficult to work with. Usually it is made either from a channel, which is connected to the piles by electric welding, or from a beam encircling the perimeter and axes of the supports. In a spacious terrace, it is best to place the stove in the center, using it to distribute the space into the guest and kitchen areas. It is quite common to install a barbecue on one side and a semicircular structure cutting off the selected corner.


Frame construction can be made from either wood or metal.
The choice of a specific material is determined by the following factors:
- convenience and practice of work;
- allocated budget;
- the required strength of the extension.

Even the high cost and difficulty of processing hard wood does not in any way negate its high strength and stable service over time. It is from such materials that the lower frame trims should be formed. To save money, their upper part is made from softer and more accessible breeds. It is unacceptable to use wood that has even the slightest signs of rotting, cracking, chips, wormholes and similar defects. The highest permitted moisture content of wood for constructing a frame is 14%, but it is better to limit it to 12%, it will be much more reliable.


The metal frame produced by welding is relatively strong. But we must take into account the fact that dismantling its individual parts will be impossible; the entire structure will need to be removed as a whole. The minimum permissible cross-section of round and profile pipes is 0.25 cm. If you take a thinner structure, welding work will be more difficult, and due to the increased stress in the metal, significant deformations may appear. Before using a used metal block, be sure to check it for any significant damage.
A terrace with a balcony always has an external fence and is quite narrow. When you need to attach a support beam to a brick structure, you will need to prepare connection points: holes are drilled in the walls into which dowels or wood plugs are mounted.


Important: placing holes with a slight slope from top to bottom helps increase the reliability of fastening, the same requirement is recommended when working with a wooden base. Often the beams for support are shortened by the width of one log at both ends, after which they are adjusted to the ends and attached with bolts, and the connection between the intermediate links is provided by hangers.
Anchor bolts help connect the timber and brick walls; special supports, the cross-section of which is 5x15 cm, can increase the reliability of such a structure. The distance between the supports should be 120 cm, and their use is especially important in areas where there is a lot of precipitation. Holes in the timber are made in increments of 400 to 600 mm; bolts with a diameter of 1 cm should pass through them freely.


Terraces made from foam blocks are much easier to build than using wood or brick, because the labor intensity of work is noticeably reduced. Products initially have correct geometric contours and strict dimensions, which allows you to accurately calculate the need for material and design the structure without errors. Structures based on foam concrete are for the most part created on top of strip foundations, but when the house is initially planned to be supplemented with a terrace, it is necessary to prepare a common slab base of the required configuration.


Legalization of the extension
Making a terrace at your dacha is technically quite simple, but regardless of the skill of the home craftsmen or the cost of the services of hired builders, you will need to register the construction with the authorities. It is impossible to do without submitting documents to the structures responsible for fire safety, sanitary and epidemiological control. The permissions received from them are transferred to the administration of the locality or rural settlement. The expenditure of time, effort and money on registration is not in vain, because in the future the absence of it may lead to sanctions, including the demolition of the building. And even if this does not happen, selling, leasing, exchanging, or providing collateral for a loan will be impossible or difficult.


Tools and materials
It is imperative to use various kinds of tools during construction.
Each master has an individual set of them, but it is impossible to build a terrace without using:
- electric jigsaw;
- bayonet shovel;
- building level;
- hammer;
- roulettes;
- chisels and screwdrivers;
- drill and marker;
- staples and paint brushes.


As for materials, you will need to use high-quality boards, cement at least M400, an antiseptic, steel blanks for structures and paint and varnish materials. A wooden terrace is relatively strong and extremely reliable, guarantees comfort and looks more attractive. In addition, construction work will proceed quickly, and costs will be significantly lower. Bricks, concrete and natural stone are much harder, but their design capabilities are worse; it will not be possible to realize a certain part of the design plans at all. The use of metal (steel and cast iron parts) allows you to create very elegant designs and decorative elements, but you will have to come to terms with increased costs.

A metal terrace will be especially expensive for those who do not know how to work with such materials on their own - and welding skills are not as common as carpentry skills, and the situation with tools is similar. The most modern options, such as wood-polymer composites, are processed more simply than traditional products, and the original PVC coating makes it possible to do without impregnations that protect against rotting. The most economical option is to use the elements left over from the construction or renovation of a house, but you will need to carefully check them for the absence of deformations and for protection from negative natural phenomena.


Step-by-step construction instructions
Properly attaching a terrace to a house means meeting two key requirements: eliminating the deflection and spring effect of the floor, and also ensuring the strength and safety of the mounted railings. It is recommended to provide for the construction of an extension already at the stage of designing a home, then it will be possible to use a common foundation and coordinate the installation of different parts with each other as clearly as possible. But when the terrace is built after finishing work on the house, you will have to order an individual project from professionals.


When building a terrace with your own hands, you need to consider:
- climatic characteristics of the area;
- soil type and freezing depth in winter;
- average annual level of snow cover;
- the type and physical condition of the wall to which the building will adjoin;
- required area and linear dimensions;
- building materials planned for use.


All this data must be immediately stated in the application for designers. Usually the terrace is placed near the wall in which the entrance is located, thanks to which it is possible to use the building not only for leisure, but also as an entrance hall and as a porch. In cold areas, it is recommended to install all extensions in the south and equip them with wide canopies. Where it is relatively warm, it is advisable to place terraces from the east or south, focusing on maximum shading of the place. The prevailing winds must be taken into account, especially if they are strong.


In any case, install waterproofing above the support beam to prevent penetration of various precipitation into the gap between the terrace and the house. Aprons made of aluminum or steel with an external galvanic coating are often used. The foundation is waterproofed with bitumen mastic or adhesive material (laid in a couple of rows). To the question of how exactly to insulate a terrace, the answer is very simple: in no way, the structure will not be heated anyway. After making the racks and rafters and installing them, it is necessary to sheathe such structures using boards or sanded slabs.


The voids separating the opposite edges are saturated with sawdust. But long before the construction of the rafters, it is necessary to deal with the base of the terrace - there is also a lot of interesting things here.
Foundation
The construction of the foundation in most cases involves the use of concrete blocks with dimensions of 0.3x0.3 m, which are buried ½ of the height into solid solid soil. Typically, the parts are placed on a sand bed so that the edge protrudes upward by 150 mm. Then parts of the frame will not rot due to contact with consistently moist soil.
Important: concrete blocks cast in artisanal conditions can replace factory products only in warm areas where there is no freezing of the soil, or it is weakly expressed. A pile foundation turns out to be the optimal and most economical solution in the middle zone on top of heaving soil.


When choosing a design, they are guided primarily by the rigidity and stability of the structure as a whole, as well as the correspondence of the foundation under the terrace and under the main house; if it is not provided, buildings may begin to deform. Racks (that is, pillars) are prepared in advance, with the help of which the load created by the terrace will be distributed evenly on the plane of the foundation. For the most part, such elements are given a cross-section of 10x10 cm, although for a large structure it will be necessary to increase the size of the supports.
Important: the racks must be attached to the foundation using brackets, since pouring concrete will lead to rapid rotting.


The racks can be made in two versions: in one they support the beams, in the other they pass through the flooring, forming fences or benches. Placing the beams on the posts can be a simple overlay or attachment using screws (bolts). The beams are aligned horizontally; if necessary, shims are used for leveling. In cases where it is planned to use not a flooring, but a solid structure made of wood, you need to give it a slight slope in the direction from the house (about 1%). By increasing the cross-section of the beams, you can make the span between the individual racks larger, that is, save on the number of blocks in the base.


For the manufacture of logs, boards measuring 5x15 cm are most often used., lay the logs at right angles with a gap of 40, 60, 80 or 120 cm - this depends on how thick the flooring will be created. The use of screw piles, grillage piles or a pile-monolithic structure is required when there is a body of water in the immediate vicinity of the construction site.
Flooring
When constructing the flooring, the logs should not be visible, but they should still be placed in advance at the same distance and strictly parallel. Then it will be easier to attach the railings later. Depending on the placement of the joists, it is possible to ensure an even and neat arrangement of the connecting screws. Or it fails - if the work was approached unprofessionally. The logs are attached using screws (bolts) to the support beam near the walls.


This beam is positioned so that a gap of 3 cm is maintained from the top point of the flooring to the base of the door opening. Then precipitation will not enter the room through the threshold. To secure the logs, it is necessary to use metal hangers in the shape of the Latin letter U. This is stiffer and more reliable than a connection made from screws and nails. In the event of the slightest damage or shift, momentary savings will result in significant losses; All professionals consider the use of support strips to be the worst method of installation.
When making a frame, most often the beams are attached to high posts passed through the boardwalks (since a completely finished railing post is immediately created). For a span of 180 cm, beams with a section of 10x15 cm are recommended, and for a larger size of 240 cm, this figure must be increased to 10x20 cm.


A country holiday at the dacha is, first of all, an opportunity to breathe the fresh air of a garden or forest twenty hours a day. It is impossible to relax and at the same time be in the stuffy box of a country house, so a summer resident who values his health sooner or later arranges with his own hands a full-fledged summer terrace with an awning or a roof. Building a terrace with your own hands is much simpler than a gazebo or veranda, so arranging a special area for a table and garden furniture, as a rule, does not require large investments, although the effect will be quite impressive.
What is the secret of the terrace
Despite a certain external similarity between the veranda and the terrace, the purpose of these buildings is different, as are the actual sizes and designs. A veranda is a part of a house with closed walls, windows and a full roof. The terrace is a landscaped outdoor area for relaxing on a sunny day with a canopy, canopy or awning. It’s easier to understand the difference if you look at photos or drawings of a classic terrace.

When choosing a place and method for building a terrace with your own hands, you can use classic techniques for arranging a recreation area:
- In close proximity to the house, using the platform and steps as a porch and platform in front of the entrance to the house;
- Take it out as a separate area and place it in a cozy, sunny and less windy place in the summer cottage. In this case, a prerequisite is the arrangement of a path, stairs or steps, with the help of which you can quickly get inside the house;
- Build a special type of roof or ceiling for a country house with your own hands, on which the recreation area will be located.
Important! It is clear that verandas and gazebos are not built this way, so any drawings and recommendations for the construction of terraces can be creatively processed, changing the dimensions to suit your wishes. The main thing is that the design is comfortable, durable and safe to use.
The dimensions of terraced areas, as a rule, can be several times larger than the dimensions of gazebo buildings, and even more so, verandas. Almost always, the base of the deck is built from wood or composite, raising the structure above the ground so that moisture and dampness do not affect the condition of the boardwalk.

Selecting the device, design and dimensions
The terrace is a one-of-a-kind building, designed not to create shade, but, on the contrary, aimed at providing the possibility of a comfortable and safe stay in the sun. Therefore, when choosing a project and site for constructing a terrace with your own hands, drawings and dimensions, you must take into account the following features:
- The design of a platform of any size, raised above the ground by more than 18-20 cm, must include fencing and railings for the terrace. For buildings that include several platforms located at different heights, intermediate steps and handrails are provided;
- The floor, railings and fences must be made of wood or a material with similar properties, for example, a polymer composite. The drawing must indicate the quality of wood processing and the type of coating applied - varnish or a protective composition based on epoxy resins;
- If there is a canopy or awning, one edge of the roof must be attached to the main wall of the house, the second rests on stationary supports embedded in the ground to a depth of at least 40 cm with a concrete blind area poured.
Important! Before choosing a diagram of how to make a terrace, it is important to choose the right material that best matches the design in the drawing.
The easiest way is to build a terrace at the corner junction of two walls of the house, as in the photo. In this case, we build a terrace and automatically get a platform in front of the entrance to the house.
Corner terrace design
The simplest option for a terrace would be to build a platform made of wood on a primitive foundation of concrete blocks or slabs, as in the drawing. The angular arrangement provides protection of the terrace area from wind and rain on both sides, so there is no need to install wind protection with polycarbonate sheets or wood panels.
If necessary, you can install a fabric awning, curtain or canopy over the terrace, the dimensions of which will be limited only by the dimensions of the walls of the house. The disadvantages of the design include the fact that if the slope is incorrect, the wooden platform can affect the distribution of rainwater, therefore the calculation and size of the slope of 3-4 degrees must be immediately recorded on the terrace drawing. The size of the foundation supports for the flooring must be calculated from a sketch or drawing, based on measurements of the entrance opening above the ground level.

For a lightweight frame structure of a terraced area, it will be enough to lay 12-15 concrete blocks or several dozen clinker tiles as a foundation. You will first need to remove the top layer of soil, fill it with fine gravel, compact it and lay a sand cushion. The most difficult thing will be to maintain the size and thickness of the sand base so that the height of the foundation columnar or slab supports does not exceed the calculated value according to the drawing.
Geotextiles can be laid on the sand, which effectively prevents the growth of weeds and grass. To fill the floor of the terrace, experts recommend first tying the supports with timber and laying joists made of wood. But in this case, you have to increase the vertical size of the terrace in height by 20-30 cm, which is not always convenient. In the simplest case, a beam measuring 60x60 mm is laid directly on the tile and fixed with pieces of reinforcement, driving it directly into the ground.
The most difficult stage of assembling a budget terrace structure will be covering the decking with boards. An oak or special decking board made of polypropylene and sawdust, 200x30 mm in size, is best suited.

For your information! The appearance and dimensions of the composite material are practically no different from processed natural boards. High resistance to moisture and absolute insensitivity to insects and pathogenic microorganisms make decking an excellent substitute for expensive oak wood.
When covering the platform frame, you must carefully follow the recommendations for installing decking boards given in the drawing. In a similar way, flooring can be made from ordinary boards pre-treated with an antiseptic.
Building a simple terrace on your own
The average size of the site is 4x2 m. We will install the wooden structure on wooden supports in a swinging pattern. Part of the terrace area will rest on pillars made of paired timber 120 cm long and 100x100 mm in size, the second part of the terrace will rest on the plank wall of the country house. To install the timber, we will drill holes in the ground with a diameter of 90 mm and hammer the supports with a sledgehammer.

Next, the supports driven into the ground must be tied with a flat board or a sheet of thick plywood with a section size of 350x40 mm. When attaching boards, it is necessary to additionally control the horizontal position of the strapping sheet.
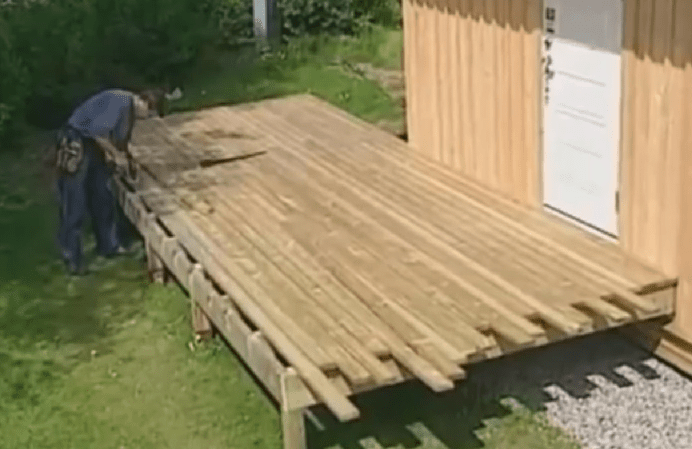
We attach the side trim boards directly to the walls of the wooden house; in the supports, you will need to cut down for installation of the longitudinal trim board.
After assembling the frame, transverse joists are installed, measuring 2.5 m with a cross-section of 100x40 mm, which will increase the rigidity of the base of the terrace platform and at the same time serve as a support for the floorboards.

At the next stage, the terrace fencing is assembled. Along the outer contour of the platform, grooves are cut out in the floorboards, after which, as in the drawing, supports are nailed under the railings. A vertical beam or board measuring 100x50 mm, 120 cm high is attached to the bottom board of the trim using self-tapping screws. A groove for the crossbars is filed on the inside of the racks, after which the lower bar and railings for the terrace area are installed.

Diagonal spacers are placed between the posts, increasing the strength of the entire fence structure.
Conclusion
The above terrace design is simple and easy to build with your own hands. If desired, you can install a small fabric awning or a full-fledged canopy made of polycarbonate or light ondulin over the terrace area. The wooden structure must be treated with protective antiseptics, and the floor must be periodically treated with wax or paraffin mastics.
