We will send the material to you by e-mail
Modern, energy-efficient LED lamps are not cheap. But they last longer than usual, and consume much less electricity. It's a shame when such a device fails. We are accustomed to the fact that lamps are disposable goods that have to be thrown away after they burn out. The topic of this article is how you can bring such a lamp back to life with your own hands. Repair of LED lamps is possible! Moreover, this task can be accomplished even by a person who is not particularly knowledgeable in electrical engineering.
LED lamp significantly saves your electricity costs
LED devices significantly save energy and at the same time provide adequate lighting. A 10-watt light bulb with diodes produces the same powerful stream of light as a hundred-watt incandescent lamp. It turns out that this one cuts your costs tenfold. Moreover, such devices are durable, unless, of course, they are made in the Middle Kingdom.
To understand possible repairs, you need to understand the principle of operation of the device. Everything here is a little more complicated than in traditional Edison lamps. Each light source, a diode, consists of two semiconductors of different materials. One contains predominantly electrons, the second – ions.
Such semiconductors are called . In the early days of this technology, devices could only emit green, yellow and red light. For this reason they were used in indicators. Modern technologies make it possible to cover the entire spectrum and use warm and cold shades, in which blue or yellow-red colors predominate.
Now directly about the device of the lamp. Externally, it is not much different from a traditional light bulb. It has the same threaded base and is suitable for all types of lamps. But inside the product has a complex structure.
A short video about:
For repair work you will need a soldering iron, a set of screwdrivers, a medical scalpel or a thin knife.
How to carefully disassemble an LED lamp and identify the cause of the breakdown
So, how to fix a 220 V LED lamp? The cause of the problem cannot always be found with a simple visual inspection. In any case, you will have to spend time and effort searching for a hidden illness. How to properly disassemble an LED light bulb? The main thing in this matter is extreme caution and accuracy. Do not use excessive force or use sharp tools where you can handle them with your hands.
Disassembly algorithm:
| Photo | Description of work |
|---|---|
 | The first stage is removing the dome. It is attached to the radiator using a thin layer of glue. Grab both parts with your hands and use a rotating motion to release the dome. Try not to squeeze the fragile plastic too much, as it may burst. |
 | After releasing the dome, you are faced with the most difficult task - separating the plate with LEDs. |
 | First you will have to unscrew the mounting bolts. Their heads are very small, so you will need a set of so-called precision screwdrivers. |
 | After removing the bolts, the aluminum plate with LEDs must be separated from the radiator. It is secured with glue, so you need to pick it up with a sharp object and carefully tear it off. |
 | The radiator must be disconnected from the base. This is done easily with the same rotational movements. |
 | To finally separate the wafer with semiconductors, you will have to unsolder the attachment points of the supply wire. |
 | After removing the LED board and heatsink, you will find the lamp power supply. |
 | To check the operation of the LED board, you will need a 12 volt power supply and two probes. They are applied to the places where the wires are soldered. If the board doesn't light up, that's the problem. Sometimes burnt out LEDs can be seen with the naked eye. |
 | Checking the operation of the power supply requires extreme caution! The lamp base should be screwed into the socket and connected. Afterwards, the voltage at the ends of the soldered wire is measured with a multimeter. The procedure is dangerous! |
LED replacement procedure
If the problem is a faulty LED, the light bulb simply stops working. If it is, then the problem is with the power board.
After detecting an extinguished diode, you need to remove it. There are three ways to determine the health of a semiconductor:
| Photo | Description of work |
|---|---|
 | Burnt-out diodes have dots or spots on the surface. In addition, you can find traces of burnout around them. |
 | You can try to test the diodes with a multimeter. |
 | You can remove questionable diodes and check their functionality with wires connected to a 12-volt power source. |
To repair a lamp, it is good to have a similar donor lamp. Semiconductors are removed from it for replacement. How to replace LED:
To consolidate the completed video lesson on this topic:
Related article:
Knowing the basic ones, you can choose the best option in terms of room illumination and operating costs. We offer you to familiarize yourself with the main types of diodes, their distinctive features and installation procedures.
LED lamp driver repair
We looked at how to repair an LED lamp with your own hands if one of the semiconductors has burned out. As you can see, the task is quite simple. Now let's consider the situation if the control unit, the lamp driver, fails.
The bridge and chip for repair, as well as other spare parts, can be purchased in the largest Chinese online store.
| Photo | Description of work |
|---|---|
 | Donor boards may be useful for driver repair. Don't rush to throw away old lamps. |
 | The bridge and the chip are removed from the board in the same way as the LEDs. Use a hair dryer to heat the surface of the board and use tweezers to easily remove the parts. |
 | After the parts are removed, their attachment points are treated with BGA solder paste. |
 | All that remains is to place the replacement parts in the vacant spaces and secure them with the same hair dryer or soldering iron with a needle tip. |
This task is for those whose hands grow from the right place. If you are not confident in your abilities or have a vision problem, just order several ready-made drivers and change them as needed.
Video on how to replace the driver:
Replacing the power supply
One of the common causes of LED lamp failure is the failure of a resistor or capacitor. It is not easy to check the condition of this part; you will have to connect the lamp to the network.
| Photo | Description of work |
|---|---|
 | The malfunction of the capacitor can be determined visually - it swells, as in this case. |
 | The swollen capacitor must be unsoldered from the board using a soldering iron. |
 | A new capacitor of appropriate power is fixed on the board, observing polarity. |
In order to replace the resistor on a lamp, you need to know the basic data of LEDs.
Video: instructions for selecting a resistor
Article
Radio-controlled LED chandeliers (with remote control) are an improved version of the classic ceiling light, which is activated by a switch. Therefore, their design does not include complex elements, but rather an additional control unit. And it’s quite possible to do the repairs yourself.
Design and basic operation
Chandeliers with remote control exist in different versions: only with LEDs; combined version (diodes and halogen lamps). But the models of the second group are most often used. The design of such chandeliers is based on the use of three main components: a radio control unit with a remote control; block of LED emitters; block with halogen lamps.
Separately, power is provided for the last two nodes: power supplies that reduce the 220V mains voltage to the required level (12/24V).
Main elements of a PU chandelier
The operating principle is based on the transmission and analysis of the signal from the remote control to the radio control unit. The last of these elements analyzes the received pulses and, depending on the type of signal, supplies voltage to the corresponding relay.
And this element, in turn, supplies power to the driver of the desired unit: with diodes or halogen lamps. Range of signal transmission from the control panel: 30-100 m. It is powered by batteries.
 Everything here is quite clear: a radio-controlled unit and several units with different types of lamps, for each of which a transformer is provided.
Determining the degree of damage to a lighting fixture
Repair of a chandelier with a remote control is carried out only after the cause of the breakdown has been determined. If the device stops shining, you need to inspect the entire structure for deformation of the elements and blackening of the insulation. Lamps with an incandescent filament are checked for functionality quite simply - just inspect the channel filament; if it is not damaged, replacement is not required. LEDs are checked using a tester.
But before dismantling the chandelier, it is necessary to assess the condition of the switch. The phase is checked, this is done after turning off the power. If current is approaching the switch, the outgoing terminals should be checked with the load applied. It is also necessary to inspect the wiring, which will require dismantling the chandelier. The current-carrying wires are usually covered by the housing of the lighting fixture or a decorative plate.
If there is no deformation of the insulating material and no blackening, then you need to look further for the cause of the failure. For reliability, it is better to check whether current is supplied to the terminals using a tester.
Checking the radio-controlled unit and remote control
If a lighting device with a control panel does not turn on, there may be two reasons: the radio signal transmission system is faulty or one of the elements of the controller board has failed.
The design of the remote control is quite simple: a microcircuit and two transistors, a button sector. The most common causes of problems are batteries and buttons.
To determine whether the controller is operational, you need to connect the LED chandelier with a control panel directly to the switch, bypassing the radio control unit. If the device turns on, it means that the faulty controller needs to be repaired.

Controller and remote control
To do all the work yourself, you need to disassemble this assembly and inspect it for deformations of the board elements.
However, the most common malfunction is the relay solder areas, which gradually lose functionality, resulting in reduced contact density. You can simply replace the module. If you have the skills, you can do the repair yourself; to do this, you need to remove the relay and solder a new element.
Why do the lamps “blink”?
The breakdown of a chandelier with LEDs is not always caused by a faulty wiring or circuit board of the controller. Sometimes the light source starts to “blink” when turned on without any visible problems inside the structure.
There may be two reasons for this phenomenon:
- Connecting the lighting fixture via an illuminated switch. In this case, when the power is turned off, the network remains not completely open. This means that the backlight emitter closes it through itself. As a result, the LEDs will blink. In this case, there is no need to do any repairs, just change the switch.
- The blinking effect is caused by the characteristics of the emitters. We are talking about a pulsating glow. High-quality LEDs are characterized by the almost complete absence of this phenomenon. Cheap analogues are more likely to “blink”. To make the repair yourself, you need to dismantle the lighting fixture and disassemble the power supply for the LED emitters. The least expensive way to solve the problem is to install an additional capacitor.
To avoid having to repair the chandelier in the future, in this case it is recommended to initially pay attention to high-quality light-emitting diodes.
Checking lamps: diode and halogen
You can determine the health of the lamps using a multimeter. In this case, you need to measure the resistance of the filament body with your own hands. Sometimes it is enough to limit yourself to a visual inspection. The fact is that lamps with incandescent filaments are checked for performance quite easily - by assessing the condition of the filament body.
Repair of a lighting fixture with a control panel will have to be performed more often if, when replacing a halogen light source, a napkin or lint-free material is not used, which will lead to rapid burnout of the lamp.
The main problem of the LED block is the serial connection of all emitters. If one of them burns out, the chandelier will go out.
It is usually recommended to change all diodes at once, since after several emitters burn out, the glow intensity of the rest will be noticeably lower. Repairing a lighting fixture with a control panel in this case will be quite expensive, since light-emitting diodes are offered at a high price.
How to avoid frequent lamp burnouts?
The reasons for the failure of different types of light sources may be different. A common negative factor for all lamps is the current surge when power is applied. In the case of halogen versions, the filament simply becomes thinner over time under such operating conditions. And the next time you turn on a lighting device with a control panel, the lamps burn out.
 Another reason is direct contact with the bulb when installing or replacing a light source. If you are going to repair the chandelier yourself, then it is recommended to use gloves made of lint-free material when unscrewing halogen bulbs. You can use a napkin.
The fact is that halogen lamps get very hot during operation. And the particles or substances remaining on the surface burn out, which leads to a redistribution of temperatures on the surface of the flask. As a result, the light source will quickly burn out.
LED emitters last much longer, however, and these lighting elements are negatively affected by the surge current when turned on. This applies to a greater extent to cheap lamps, where low-quality materials and elements are often used. The blame for the rapid failure of such emitters lies with the ballast converter.
Modern manufacturing technologies of lighting equipment have provided society with LED devices, which have brought lighting to a completely new operating level. LEDs are currently used as light sources almost everywhere. They have almost completely replaced uneconomical incandescent light bulbs from the market, as well as luminescent and gas-discharge light sources that are harmful to human health and the environment. Therefore, repair of modern LED lamps is a relevant business today.
LED elements have many advantages over their competitors. One of the main ones is a fairly long period of operation. But sometimes they also fail. There are many companies that provide repair services for lighting equipment, but in order to save your own money, you can repair such illuminators yourself at home.
In this article:
Design of LED illuminators
The main structural element of LED products is a diode, which emits a luminous flux as a result of the passage of electric current through it. In order to know how to repair such equipment with your own hands, you need to know the principle of its operation.
For your information! The operating principle of LED lamps is the same for all models. Therefore, having studied it, you will be able to undertake independent repairs of any such illuminator.
To figure out where to start repairing equipment, you need to study its design features.
Basic design elements of an LED lighting device
Models of LED illuminators, as a rule, are distinguished by their unusual housing. Its appearance can be matched to absolutely any design decision when decorating the interior of an apartment or your own home. The functionality of the product is not particularly important, since it is just a container for the main parts of the lamp.

This part performs the function of a power converter. The driver can supply constant current. Often this element is the cause of failure of LED equipment.
It is important to know! All LED products operate on voltage less than the mains voltage (220V), that is, 12V or 24V. Therefore, installing a driver is a prerequisite for connecting the light to the mains.

The main element of the equipment is the source of light flux. Once converted by the driver, the electrical energy is transferred to the LEDs, which produce light.

The function of this part is to cool the light source.

Optics (reflectors, lenses, prisms)
With the help of optical components (prisms, lenses), the emitted light flux from LEDs is converted into acceptable light for the human visual organs.

This device is the most common LED equipment. But there are also LED lamps that can be controlled remotely. A remote control is included with the delivery of such a light.
Design features of remote-controlled lamps
LED illuminators, controlled remotely using a remote control, have appeared on the market quite recently. They differ from the standard product design by additional elements.
For example:
- An LED chandelier suspended from the ceiling includes a housing, driver, and controller unit in its design. The driver is equipped with terminals (special clamps) to which power is supplied. From the block to the lamps in the standard version of the lighting device, from 1 to 12 wires can be installed, the number of which depends on the design solution of the device.
- The design of remote-controlled LED chandeliers or sconces additionally includes an antenna, a voltage regulator, and special units for automatically adjusting the brightness of the light flux.
For your information! Raster models of LED illuminators can be equipped simultaneously with several drivers and LEDs of different types. Therefore, it is necessary to understand that checking and repairing LED equipment completely depends on its type.

Common types of breakdowns
Due to the complexity of the design, lighting devices with LED light sources can have various breakdowns, the type of which will determine the possibility of carrying out independent repairs of lighting equipment.
Common faults:
- lighting disappeared completely (partially);
- during operation of the illuminator, it spontaneously turns off;
- short-term flickering of the light flux;
- failure of the LED or light bulb.
The listed malfunctions can occur for a variety of reasons.
The most common causes of problems requiring LED lamp repair:
- The equipment operates in unfavorable operating conditions. When purchasing lighting systems of this type, you must first find out the optimal conditions for their operation.
- Equipment overheating. The problematic temperature for LED elements is from 50 °. As a result of the increased temperature, the contacts of the thread or driver may separate, or the contacts on the board may peel off.
- Partial (complete) burnout of the LED element. Reasons: capacitor burnout, network overvoltage. This type of malfunction is more often characteristic of cheap lighting devices on which cheap low-quality boards are installed.
These are the most common reasons for the breakdown of such equipment, but there are others.
For example:
- incorrect connection of the device to the electrical network;
- incorrect installation of equipment;
- short circuit in the circuit;
- The device connection diagram is not followed (poor soldering of lighting fixture elements, etc.).
It is important to know! Quite often, LED ceiling chandeliers with remote control fail due to defects made by the manufacturer of the product.
Conclusion: LED lighting devices can fail for a variety of reasons, so before repairing the lamps, it is necessary to establish the source of its malfunction.
Preparation for repair
To independently carry out quick and high-quality repairs of any electrical equipment at home, preliminary preparation is required.
The main stages of preliminary preparation for repairs
- First of all, it is worth finding out the source of the malfunction (driver, LED or other element of the lighting design). To do this, you need to remove the device from its permanent location and place it on your desktop.
- Next, you need to prepare the tools: a set of screwdrivers, pliers (may be needed to remove a case connected by twists), a multimeter (to check contacts), insulating tape, tweezers (may be useful for working with the smallest equipment components). You may need to do some soldering work, so have a soldering iron on hand as well. If there is a need to replace the LEDs, then for this event you can use a drill with a set of drills of different diameters.
It is important to follow safety rules when carrying out electrical work! Therefore, all tools used for repairs must be protected.
After the workplace has been prepared, all the necessary tools have been collected, the lighting fixture has been removed, the causes of its breakdown have been identified, and repair work can begin.
Carrying out repairs
Let's look at an example of repairing Juwel LED aquarium lights. The easiest way to repair electrical products is without remote control. They are all designed according to a single scheme, which includes the following details:
- LEDs that can be combined into one compact bridge;
- resistance resistors;
- capacitors (electrolytes);
- coil with winding.
Repair of such a device is carried out in the following sequence:
- the aquarium light is first removed;
- then it is disassembled;
- First of all, the board is visually inspected for visible faults: broken wiring, defective driver, or other elements of the electrical circuit. If such malfunctions are not detected, you can consider yourself lucky;
- Next, you need to inspect the appearance of the LED element and the location of the LEDs. If there are burnt areas on the diodes, this is the first indicator of their failure;
- if obvious damage is detected, for example, broken wires, burnt-out diodes, drivers, or other malfunctions, such parts must be replaced and the disconnected contacts must be soldered;
- Additionally, you can perform preventive work, that is, repack the terminal blocks, tighten the bolts, etc.
If the source of the malfunction has not been detected, the functionality of the LED circuit is checked by performing the following manipulations:
- LED illuminator is securely fixed;
- then current is supplied to it (it is recommended to use a separate power supply for devices with a power of 12V, 24V;
- all LEDs “ring” one by one (when connecting a light bulb to a power source, you can use ordinary tweezers, with which the contacts on each individual diode are closed);
- in case of contact with a burnt-out LED, the light bulb will light up;
- All that remains is to replace the faulty part, assemble the device and install it in its place.
Important to remember! Replacing LEDs with a jumper can only be done if there are more than 10 LED elements in the overall electrical circuit. Otherwise, the capacitors will be overloaded and the block LEDs will burn out.
Despite the diversity on the country's shelves, they remain unrivaled due to their cost-effectiveness and durability. However, a quality product is not always purchased, because in a store you cannot take the product apart for inspection. And even in this case, it is not a fact that everyone will determine from what parts it is assembled. burn out, and buying new ones becomes expensive. The solution is to repair LED lamps yourself. Even a novice home craftsman can do this work, and the parts are inexpensive. Today we will figure out how to check in what cases the product is repaired and how to do it.
It is known that LEDs cannot operate directly from a 220 V network. To do this, they need additional equipment, which, most often, fails. We'll talk about it today. Let's consider the circuit, without which the operation of the lighting device is impossible. At the same time, we will conduct an educational program for those who do not understand anything about radio electronics.

driver gauss 12w
The 220 V LED lamp driver circuit consists of:
- diode bridge;
- resistance;
- resistors.
The diode bridge serves to rectify the current (converts it from alternating to direct). On the graph it looks like cutting off a half-wave of a sine wave. Resistors limit the current, and capacitors store energy, increasing the frequency. Let's look at the operating principle of a 220 V LED lamp.
The principle of operation of the driver in an LED lamp
| View on the diagram | Operating procedure |
 | A voltage of 220 V is supplied to the driver and passes through a smoothing capacitor and a current-limiting resistor. This is necessary in order to protect the diode bridge. |
 | Voltage is supplied to a diode bridge, consisting of four differently directed diodes, which cut off the half-wave of the sine wave. The output current is constant. |
 | Now, by means of a resistance and a capacitor, the current is again limited and the desired frequency is set. |
 | Voltage with the necessary parameters is supplied to unidirectional light diodes, which also serve as a current limiter. Those. when one of them burns out, the voltage increases, which leads to failure of the capacitor if it is not powerful enough. This happens in Chinese products. High-quality devices are protected from this. |
Having understood the principle of operation and the driver circuit, the decision on how to repair a 220V LED lamp will no longer seem difficult. If we talk about quality products, then you shouldn’t expect any troubles from them. They work for the entire prescribed period and do not fade, although there are “diseases” to which they are also susceptible. Let's talk about how to deal with them now.
Reasons for failure of LED lighting devices
To make it easier to understand the reasons, let’s summarize all the data in one common table.
| Cause of failure | Description | Solution |
| Voltage drops | Such lamps are less susceptible to breakdowns due to voltage surges, however, sensitive surges can “break through” the diode bridge. As a result, the LED elements burn out. | If surges are sensitive, you need to install one, which will significantly extend the life of the lighting equipment, but also other household appliances. |
| Incorrectly selected lamp | Lack of proper ventilation affects the driver. The heat it generates is not removed. The result is overheating. | Choose one with good ventilation that will provide the necessary heat exchange. |
| Installation errors | Incorrectly selected lighting system and its connection. Incorrectly calculated electrical wiring cross-section. | Here the solution would be to unload the lighting line or replace lighting fixtures with devices that consume less power. |
| External factor | Increased humidity, vibration, shock or dust if the IP is incorrectly selected. | Correct selection or elimination of negative factors. |
Good to know! Repair of LED lamps cannot be carried out indefinitely. It is much easier to eliminate negative factors that affect durability and not purchase cheap products. Savings today will result in costs tomorrow. As economist Adam Smith said, “I am not rich enough to buy cheap things.”

Repairing a 220 V LED lamp with your own hands: nuances of the work
Before you repair an LED lamp with your own hands, pay attention to some details that require less labor. Checking the cartridge and the voltage in it is the first thing to do.
Important! Repairing LED lamps requires a multimeter - without it you will not be able to ring the driver elements. You will also need a soldering station.
household multimeters
A soldering station is necessary for repairing LED chandeliers and lamps. After all, overheating of their elements leads to failure. The heating temperature when soldering should be no higher than 2600, while the soldering iron heats up more. But there is a way out. We use a piece of copper wire with a cross-section of 4 mm, which is wound onto the soldering iron tip in a tight spiral. The more you lengthen the tip, the lower its temperature. It is convenient if the multimeter has a thermometer function. In this case, it can be adjusted more accurately.
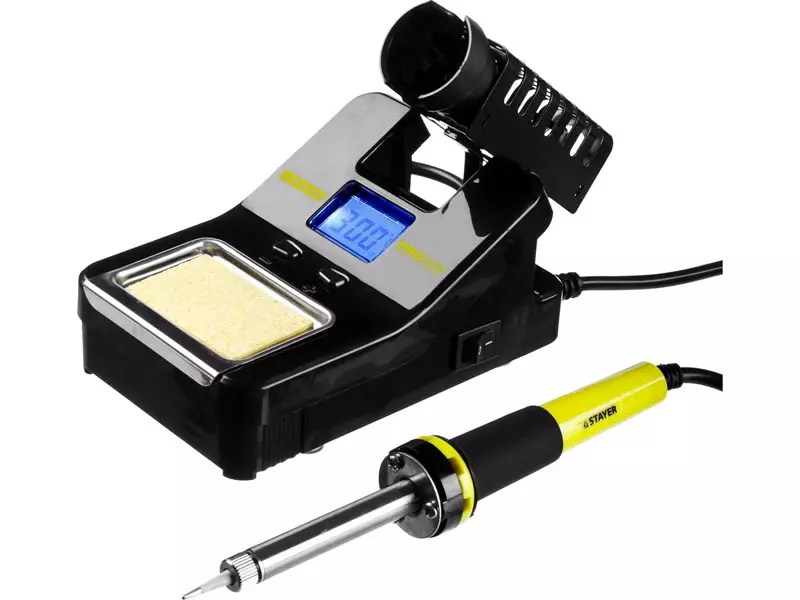
Soldering Station
But before you repair LED spotlights, chandeliers or lamps, you need to determine the cause of the failure.
How to disassemble an LED light bulb
One of the problems that a novice home DIYer faces is how to disassemble an LED light bulb. To do this you will need an awl, solvent and a syringe with a needle. The LED lamp diffuser is glued to the body with sealant, which needs to be removed. Carefully running an awl along the edge of the diffuser, inject the solvent with a syringe. After 2-3 minutes, easily twisting, the diffuser is removed.

Some lighting fixtures are made without sealant. In this case, it is enough to rotate the diffuser and remove it from the body.
Determining the cause of failure of an LED light bulb
After disassembling the lighting fixture, pay attention to the LED elements. Burnt is often identified visually: it has scorch marks or black dots. Then we replace the faulty part and check its functionality. We will tell you in detail about the replacement in step-by-step instructions.
If the LED elements are in order, move on to the driver. To check the functionality of its parts, you need to remove them from the printed circuit board. The value of resistors (resistance) is indicated on the board, and the parameters of the capacitor are indicated on the case. When testing with a multimeter in the appropriate modes, there should be no deviations. However, often failed capacitors are identified visually - they swell or burst. The solution is to replace it with suitable technical parameters.

Replacing capacitors and resistances, unlike LEDs, is often done with a regular soldering iron. In this case, care should be taken not to overheat nearby contacts and elements.
Replacing light bulb LEDs: how difficult is it?
If you have a soldering station or hair dryer, this work is simple. It is more difficult to work with a soldering iron, but it is also possible.
Good to know! If you don’t have working LED elements at hand, you can install a jumper instead of the burnt one. Such a lamp will not work for a long time, but it will be possible to gain some time. However, such repairs are carried out only if the number of elements is more than six. Otherwise, a day is the maximum work of the repair product.
Modern lamps operate on SMD LED elements, which can be desoldered from the LED strip. But it is worth choosing the ones that are suitable according to technical characteristics. If there are none, it is better to change everything.

Related article:
To choose the right LED devices, you need to know not only the general ones. Information about modern models and electrical diagrams of working devices will be useful. In this article you will find answers to these and other practical questions.
Repairing an LED lamp driver if you have an electrical diagram of the device
If the driver consists of SMD components that are smaller in size, we will use a soldering iron with copper wire on the tip. A visual inspection revealed a burnt element - solder it out and select the appropriate one according to the markings. There are no visible damages - this is more difficult. You will have to solder all the parts and ring them separately. Having found a burnt one, we replace it with a functional one. It is convenient to use tweezers for this.
Helpful advice! You should not remove all elements from the printed circuit board at the same time. They are similar in appearance, you can later confuse the location. It is better to unsolder the elements one by one and, after checking, mount them in place.

How to check and replace the power supply of LED lamps
When installing lighting in rooms with high humidity (or), stabilizing ones are used, which reduce the voltage to a safe one (12 or 24 volts). The stabilizer can fail for several reasons. The main ones are excessive load (power consumption of luminaires) or incorrect selection of the unit’s degree of protection. Such devices are repaired in specialized services. At home, this is unrealistic without equipment and knowledge in the field of radio electronics. In this case, the power supply will have to be replaced.

LED power supply
Very important! All work to replace the stabilizing LED power supply is carried out with the voltage removed. Don't rely on the switch - it may not be connected correctly. The voltage is turned off in the apartment's distribution panel. Remember that touching live parts with your hand is dangerous.
You need to pay attention to the technical characteristics of the device - the power must exceed the parameters of the lamps that are powered from it. Having disconnected the failed unit, we connect a new one according to the diagram. It is located in the technical documentation of the device. This does not present any difficulties - all wires are color-coded, and the contacts are labeled with letters.

The degree of protection of the device (IP) also plays a role. For a bathroom, the device must be marked at least IP45.
Article
With the advent of LED technology, lighting systems have reached a whole new level. Economical, environmentally and electrically safe devices are used everywhere today - they have replaced the standard “Ilyich lamps” and the “housekeepers” that have gained popularity. The former have long been outdated from a moral point of view, the latter are extremely dangerous to health due to the mercury vapor contained inside.
Despite their long service life, even such devices fail over time. In some situations, expensive repairs of LED lamps can be done independently, at home, which we will consider further.

Elements of LED light sources
Before disassembling a failed LED lamp into its component parts, be sure to study its structure and operating principle. Standard equipment of this type consists of an electronic power board, a light filter and a housing with a base. Cheaper models use conventional capacitors instead of current and voltage limiters.
One lamp can contain several dozen LEDs, which are connected in series or in parallel. In the second case, the design turns out to be expensive (a separate resistor is connected to each LED diode or group), so not everyone can afford it.
The operating principle of an LED is almost identical to a semiconductor element. The current between the anode and cathode moves in a straight line, which leads to the formation of a glow. Each LED individually is characterized by a minimum power, which is why several are used at once. To create the required luminous flux, a phosphor coating is used, which transforms the light into a spectrum visible to the human eye.
High-quality models contain a high-tech driver that performs the function of a converter along with a diode group. The primary voltage goes to a transformer, which reduces the current characteristics. At the output of the element we obtain the direct current necessary to power the LED diodes. In order to reduce ripple in the circuit, an auxiliary capacitor is used.

Despite the numerous varieties, differences in devices, and the number of LEDs used, all lighting devices of this type are characterized by the same design, which simplifies their maintenance.
Types of breakdowns and their causes
There are several possible malfunctions of LED devices, which is due to their similar, but rather complex design. The most common breakdowns among others are accompanied by the following points:
- complete absence of glow;
- periodic lack of lighting;
- short-term flickering;
- turning off the lights at random times;
- damage to the light bulb or LED.
There are even more reasons for breakdowns. The most common of them are the following:
- Violation of the rules and recommendations for the operation of LED devices. When buying a new lamp, be sure to study the operating conditions specified in the technical manual. If you ignore any rule, the likelihood of breakdowns increases several times.
- Equipment overheating. The LEDs themselves practically do not heat up during operation, but if the temperature exceeds the stated 50–60 degrees, then the filament, holder, or detachment of contacts on the electronic board may occur. Overheating sometimes occurs due to the fact that a lamp not intended for this purpose is installed inside the stretch ceiling. This prevents its natural cooling.
- LED diode burnout - complete or partial. This can be caused by high mains voltage surges or capacitor burnout.

Important! The last failure is relevant for cheap devices that use low-quality boards.
If you go deeper, you can identify several other, rarer, but no less interesting reasons why an LED lamp may not work:
- technical violations when connecting to the power supply;
- short circuit;
- incorrect installation of equipment;
- errors when constructing elements in the connection diagram;
- low quality product - when trying to save money, do not forget that you are buying a “pig in a poke.”
In such devices, the contacts may initially be poorly soldered, or a cheap capacitor may be used instead of a driver. This is a so-called manufacturing defect.
LED ceiling lights with a remote control often fail precisely because of manufacturing defects. Thus, to carry out repairs, it is important to correctly determine not only the breakdown, but also the cause of its occurrence.

Preparation for repair of LED devices
To perform high-quality repairs that guarantee the serviceability of the product and its long-term operation in the future, painstaking preparation is necessary. First, dismantle the chandelier or wall lamp. For table lamps, simply unplug them. In the future, some tools and materials will be useful, including a screwdriver, pliers, electrical tape, and a knife. Pliers or pliers are useful if the device body is connected using special twists. Use a multimeter to check the contacts.
Since LEDs are small in size, tweezers are useful for manipulating them. Subsequently, if a break in the circuit is detected or the need to replace any element, a soldering iron may be required. To replace LED diodes, use a drill with a variety of drill bits.
Do not forget that each tool must have electrical insulation - it is prohibited to perform work with pliers or pliers with bare metal handles.

Design of LED chandeliers and visual inspection
LED pendant lights operating from a remote control have appeared relatively recently. Not everyone is familiar with their design, so let’s briefly consider the design of the devices.
In the simplest configuration, an LED chandelier consists of a housing (metal, plastic, glass), a block with a controller (driver). The last element is used as a voltage rectifier; terminals and clamps are placed on it, to which power is supplied from an industrial network. The power supply is connected to the lamps by wires.
Complex chandeliers use an antenna, a control unit, and a regulator (several units) necessary for automatic adjustment. Raster lighting devices contain several drivers and LED lamps of various types. The repair sequence directly depends on the specific type of lamp.
Study the design of the device using the instructions supplied with it to understand where the control units are located. They can be installed both inside and outside the product.
Repairing a chandelier without a remote control is much easier. This device contains a diode or diode bridge with electrolytes and resistors. There is also a coil with winding to reduce ripple.

To properly repair an outdoor or indoor lamp, follow the step-by-step instructions:
- Remove the device from the ceiling or wall and remove the housing cover.
- Examine the electronic circuit to see visible defects (or confirm their absence). These include wire breaks.
- Remove the lampshade and other decorative decorations from the equipment, and unscrew the LED bulbs, if used.
- Examine the base for burnt areas. You can use a regular knife for cleaning.
- Re-twist, tighten all the screws on the elements attached to the board. If there are no visible defects, examine the lamp directly.
The easiest way to check a lamp's LED circuit
Let's look at the easiest method for checking an LED circuit. First, fix the lamp using a cut plastic bottle with a smaller diameter. The lamp is inserted into it. To supply power, use an auxiliary power supply (if we are talking about a 12 or 24 V device).
Instead of ringing every LED in the circuit, you can use a simpler method. In turn, install a jumper between the contacts of each diode using tweezers. If there is no jumper, then take any wire, first stripping both ends and tinning the contacts.
It is important that the lamp is connected to the network at this moment. As soon as you close the contacts on the burnt out LED, the device will light up. If this does not happen, then more than one diode may have burned out.

Continue visual inspection of the circuit and look for burnouts, swollen capacitors, and examine each trace on the board. If broken contacts are found, perform soldering. If the circuit consists of 10 or fewer elements, then under no circumstances replace a burnt-out LED with a wire or jumper. This can lead to overloading the coils and burning out the diodes.
Troubleshooting a remote controlled chandelier
Most often, the reason for the breakdown of a chandelier with a remote control is overheating of the matrix. In such a situation, repairs are performed as follows:
- Remove and disassemble the chandelier.
- Find out the cause of the breakdown - look for burnt out elements.
- If you need to replace components and perform soldering, be sure to study the device diagram attached to the warranty card.
The controller, antenna or control unit may burn out. In this case, a banal replacement of the failed product is required.
Cooling radiators
Most LED lighting fixtures come with cooling radiators. The presence of this element is a sign of the high quality of the device. In these products, a special seat is allocated, and a radiator is used to remove heat. The thermal paste needs to be replaced periodically. If this is not done, then over time the radiator will lose its effectiveness and the board or unit will burn out. Disassemble the device and make sure that thermal paste is applied to both surfaces of the seat.
If necessary, apply a thin layer of special lubricant yourself to the entire surface of the seat. Too much thermal paste affects heat transfer just as negatively as its absence. To increase thermal output, you can screw an additional aluminum plate to the radiator, but make sure that it does not block the main air flow.

High-quality repair of LED light sources with your own hands is possible provided that safety rules are followed and the design diagram of the electrical device is available. The article described in detail the main causes and types of faults, and provided recommendations for finding and eliminating them.
