Beginner radio amateurs who are interested in independently assembling circuits and repairing various electronic devices are lost in a sea of numerous terms and details. Meanwhile, you can give a number of tips on what knowledge is needed first of all, what instruments to use, how to navigate when choosing circuit elements.
Required knowledge
It is very important for radio amateurs:
- know and understand the basic laws of electrical engineering;
- be able to navigate using diagrams;
- clearly define the role of each element in the diagram and visually represent what it looks like.
Important! Theoretical knowledge must be constantly supported by practice.
Tools and devices
To assemble amateur radio circuits and homemade structures, you must have the following tools:
- A soldering iron, the power of which should be chosen average - no more than 40 W. More advanced craftsmen are thinking about purchasing a soldering station;
- Side cutters. Not too massive a tool for working with radio devices;

- Tin-lead solder exists in the form of wire.
Important! Among all the devices, the main, and often the only, is a digital multimeter or analog tester, with which you can measure all the main parameters of the circuit.
Before you start assembling simple and interesting DIY radio circuits, you can practice dismantling old radio equipment. At the same time, practical skills in soldering work are formed.
- In ancient TVs with lamps, a completely suitable thing is a supply transformer. It can be used in many homemade radios. For example, assemble a charger for a car battery or a power supply for an audio amplifier. The main thing is to know its technical data;
- In obsolete radio electronics devices: television equipment, video recorders, ordinary tape recorders, there are entire microcircuits ready for use. For example, we can name an audio amplifier, the circuit of which is constructed by simply assembling components, without etching on printed circuit boards, etc.;
- The tone control is also used ready-made. At the same time, the assembled audio amplifier will receive new options: the ability to control the low-frequency and high-frequency ranges, change the balance in stereo speakers;
- Basically, all devices manufactured by radio amateurs operate on five-, nine- and twelve-volt power supplies. Such power supplies from old equipment will be the most useful.
You can use any available designs as housings for circuits or buy ready-made ones of different sizes and shapes. Housings from non-working devices are often used for new homemade radios.
A non-working power supply from a computer is very valuable, where does it come from:
- a lot of radio components: transistors, capacitors, diodes, resistances, which are useful for assembled devices;
- cooling radiators are an important accompanying element for high-power transistors;
- good wires;
- the building itself is an excellent place to place new structures.

Circuit assembly methods
- Wall-mounted installation. Simple soldering of components in accordance with the developed circuit. Soldered assemblies can be installed on supporting platforms. The method is suitable for constructing radio circuits from a small number of parts;
- Installation on a printed circuit board - a textolite platform on which foil tracks are made as connecting conductors.
The second method is divided into several options:
- Mechanical. Cutting paths with a sharp object to eliminate contact connections in unnecessary places;
- Chemical. Using varnish or paint, you need to draw the required diagram on the foil. Then immerse in a special composition - a solution of ferric chloride. After processing, a pattern corresponding to the design will be obtained, and all areas without varnish will be removed by dissolution;
- Laser ironing.
What schemes should I start with?
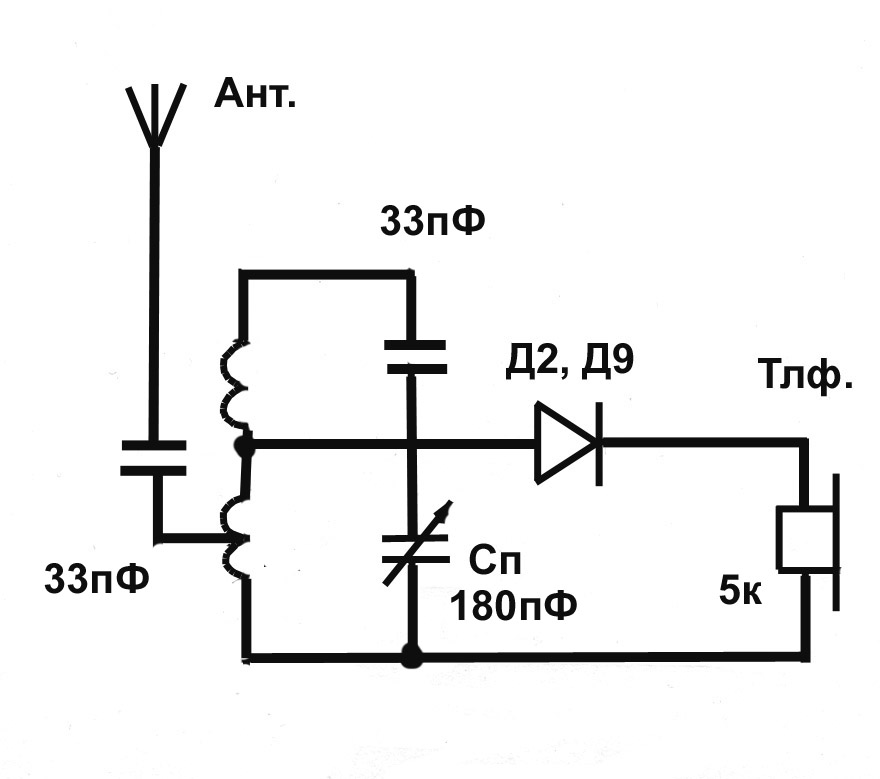
The classic start for radio amateurs is to make a simple detector receiver. The circuit contains a small number of components and can be assembled by anyone. Then you can supplement the device with an audio amplifier using transistors. With the arrival of experience and understanding, work with microcircuits begins.
A large number of interesting and very simple options for homemade radios with descriptions of parts and diagrams are available on the RadioKot website. You can, for example, assemble color music, pulsed clock illumination, a stereo transmitter and much more. There are also useful forums where you can clarify complex issues and communicate with experienced professionals.
As you gain skills, your interest in assembling complex devices will increase. Radio-electronic homemade products are one of the most exciting activities for people of all ages.
Video
Since you have decided to become a self-taught electrician, then probably after a short period of time you will want to make some useful electrical appliance for your home, car or cottage with your own hands. At the same time, homemade products can be useful not only in everyday life, but also made for sale, for example. In fact, the process of assembling simple devices at home is not difficult at all. You just need to be able to read diagrams and use the ham radio tool.
As for the first point, before you start making electronic homemade products with your own hands, you need to learn how to read electrical circuits. In this case, ours will be a good helper.
Among the tools for novice electricians, you will need a soldering iron, a set of screwdrivers, pliers and a multimeter. To assemble some popular electrical appliances, you may even need a welding machine, but this is a rare case. By the way, in this section of the site we even described the same welding machine.
Special attention should be paid to available materials, from which every novice electrician can make basic electronic homemade products with their own hands. Most often, old domestic parts are used in the manufacture of simple and useful electrical appliances: transformers, amplifiers, wires, etc. In most cases, novice radio amateurs and electricians just need to look for all the necessary tools in a garage or shed in the country.
When everything is ready - the tools have been collected, spare parts have been found and minimal knowledge has been obtained, you can proceed to assembling amateur electronic homemade products at home. This is where our small guide will help you. Each instruction provided includes not only a detailed description of each stage of creating electrical appliances, but is also accompanied by photo examples, diagrams, as well as video lessons that clearly show the entire manufacturing process. If you don’t understand some point, you can clarify it under the entry in the comments. Our specialists will try to advise you in a timely manner!
For those just starting to take their first steps into electronics, it is important to start somewhere. Well, we invite you to familiarize yourself with ideas that may come in handy in the future and at the same time give you an idea of how something should be done. What to choose if you want to make simple ones with your own hands? Here are options that can be used in everyday life.
Simple power regulator for smooth switching of lamps
This type of device has found wide application. The simplest is a regular diode, which is connected in series with the load. Such regulation can be used to extend the life of an incandescent lamp, as well as to prevent overheating of the soldering iron. They can also be used to change power over a wide range of values. First, there will be the simplest DIY electronic crafts. You can see the diagrams here.
How to protect yourself from mains voltage fluctuations

This device turns off the load if the mains voltage is outside the permissible limits. As a rule, a deviation of up to 10% from the norm is considered normal. But due to the peculiarities of the energy supply system in our country, such limits are not always observed. So, the voltage can be 1.5 times higher, or much lower than necessary. The result is often unpleasant - the equipment fails. Therefore, there is a need for a device that will turn off the load before something has time to burn out. But when creating such a homemade product, you need to be careful, since the work will be carried out with considerable stress.
How to make a safety transformer
Transformerless power supplies are often used in various electronic designs. Typically, such devices have low power, and to avoid electrical injury, they are placed in an insulating plastic case. But sometimes they need to be configured, and then the security is broken. To avoid possible injury, use an isolating safety transformer. It will also be useful when repairing such devices. Structurally, they consist of two identical windings, each of which is designed for the network. As a rule, the power of transformers of this type ranges from 60-100 W; these are the optimal parameters for setting up various electronics.
Simple emergency lighting source

What to do if it is necessary that in the event of a power outage, the illumination of a certain area is maintained? The answer to such calls can be an emergency lamp made on the basis of a standard energy-saving lamp, the power of which does not exceed 11 Watts. So if you need light somewhere in the corridor, utility room or workplace, this homemade product will come in handy. Usually, if there is voltage, they operate directly from the mains. When it disappears, the lamp begins to function on battery power. When the mains voltage is restored, the lamp will work and the battery will automatically charge. The best electronic DIY projects have been left for the end of the article.
Boost power regulator for soldering iron

In cases where it is necessary to solder massive parts or the mains voltage often drops, using a soldering iron becomes problematic. And a step-up power regulator can help out of this situation. In these cases, the load (i.e., the soldering iron) is powered using rectified mains voltage. The change is carried out using an electrolytic capacitor, the capacitance of which allows you to obtain a voltage greater than 1.41 network voltage. So, with a standard voltage value of 220 V, it will give 310 V. And if there is a drop, say, to 160 V, then it will turn out that 160 * 1.41 = 225.6 V, which will allow for optimal operation. But this is just an example. You have the opportunity to make a scheme that is suitable specifically for your conditions.
The simplest twilight switch (photo relay)

As new parts are created, fewer components are now needed to make a device. So, for a regular twilight switch, only 3 of them are needed. Moreover, thanks to the versatility of the design, multi-purpose use is possible: in an apartment building; for lighting the porch or courtyard of a private home, or even a separate room. Pointing out the features of such a design as a twilight switch, it is also called a “photo relay”. You can find many implementation schemes that were made either by amateurs or industrialists. They have their own set of positive and negative properties. Negative properties are usually either the need for a constant voltage source or the complexity of the circuit itself. Also, when buying cheap and simple parts or entire sets, they often complain that they simply burn. The functionality of the scheme is based on three components:
- Photocell. It is usually understood as photoresistors, phototransistors and photodiodes.
- Comparator.
- Triac or relay.
When there is daylight, the resistance of the photocell is low and does not exceed the response threshold. But as soon as it gets dark, the structure will be turned on at that very moment.
Conclusion
Here are some interesting electronic crafts you can make with your own hands. The main thing in cases where something doesn’t work out is to keep trying, and then everything will work out. And after gaining experience, it will be possible to move on to more complex schemes.
Many electrical appliances can be repaired or new ones can be made with your own hands. For this home, there will always be something that can be converted to perform new functions: an old electronic watch, a children's car, an out-of-use computer and much more. Useful crafts can always be repaired or remade. It is better to have a workshop with tools for work.
Equipped master's home workshop
power unit
Homemade electronic devices require different voltages. In particular, soldering requires a regulated power supply. This opportunity can be provided by the LM-317 chip, which is a voltage stabilizer.

Regulated power supply circuit
Devices based on this circuit allow you to change the output voltage within 1.2-30 V using a variable resistor P1. The permissible current is 1.5 A, the power of the device depends on the choice of transformer.
The voltmeter is adjusted using trimming resistor P2. To do this, set the current to 1 mA at a circuit output voltage of 30 V.
The greater the difference between the input and output signals, the more power is allocated to the microcircuit. To reduce heat, it requires a radiator with a cooler.
A homemade board with an LM-317 chip is placed in a case - a computer power supply. A voltmeter and clamps for the output wires are installed on the front PCB panel.
Simple auto tester
A sampler for cars and other purposes should always be on hand at home, in the garage or on the go. The figure below shows a homemade circuit that allows you to check electrical circuits with a resistance of up to 10 kOhm and the presence of a voltage of 6-15 V.
Two indication circuits are connected in series to the battery and in parallel to each other. The first consists of resistor R1 and LED HL1, which lights up when checking the voltage. At the same time, the battery is recharged.

Circuit and design: a) homemade circuit, which allows you to check electrical circuits with a resistance of up to 10 kOhm and the presence of a voltage of 6-15 V; b) homemade design of a test probe
When a circuit is tested, current flows from the battery through circuit HL2, R2. At the same time, the HL2 LED lights up. Its brightness will be greater, the lower the circuit resistance.
Like all homemade products, the tester can be constructed in different ways, for example, by placing it in a transparent plastic case, which is easy to glue together with your own hands.
Such devices are indispensable when repairing an electrical network or household appliance at home. Crafts can be more complex and have additional functions.
Electric devices for heat treatment of meat products without the use of fuel are made for a small number of portions and can be used at home or in the country. To prepare barbecue using an electric barbecue maker, there is no need to spend expensive hours of rest standing outside at the barbecue.
In specialized stores you can choose any device, but the price decides a lot. If you have skills in handling electricity, it will be much cheaper to make an electric kebab maker with your own hands.
The structures are made in horizontal or vertical design. The power of the device usually does not exceed 1.5 kW. The meat is heated using a spiral with a tungsten or nichrome thread. All metal parts are made of stainless steel.
Typical devices are vertical heaters in the center and skewers with product around. They are attached from above. It is advisable to make skewers in the form of spirals, from which the meat does not slide down during the cooking process.

Vertical type of electric kebab maker
To make high-quality barbecue with your own hands, the skewers should be placed as close as possible to the heater, but so that the product does not touch the spiral. When placed at a distance, the meat will not fry, but will dry out.
Pieces of product no larger than 40 mm in size are placed on a skewer, which is placed vertically around the heater. Then the electricity is turned on and the coil is heated.
The heater is based on a heat-resistant ceramic tube on which a spiral is wound. Fastening at the bottom is done using a special cartridge.
In the round base there are special cups for collecting fat and a frame that serves to hold the skewers vertically.
Cups are made of stainless steel. They have cross-shaped protrusions at the bottom, which are inserted into the slots in the base. Inside they have devices for attaching skewers. Fixing the cup on both sides allows them to hold the skewers vertically.
The connection must be strong and at the same time easy to disassemble for cleaning. You can make a common removable tray for all skewers.
The cross-section of the supply wire is selected to match the power of the heater (2.5 or 4 mm2). At home or in the country there should be a 16 A socket for it.
Timer for watering plants
Devices with timers are used for drip irrigation of an area from a container at a certain time. They can be connected to valves with any capacity.
Often branded devices do not provide the required reliability. Then an old wall clock comes to the rescue, which is in working order, but is no longer used at home. Small magnets are attached to the ends of the minute and hour hands, and there are 3 reed switches on the dial.

Timer circuit for watering plants, which uses a wall clock
As soon as the hour hand reaches the number 7, and the minute hand reaches 12, which corresponds to the time of 7 o'clock, the reed switches SA1 and SA3 are triggered and the signal opens the solenoid valve. After 2 hours, the arrows will move to 9 and 12, and current will flow through the contacts of the reed switches SA1 and SA2 to close the valve.
The diagram shows a “rain sensor”, which in wet weather closes transistor VT1 and the valve remains constantly closed. Manual control of the solenoid valve is also provided via buttons S1 and S2.
The clock can be set to any time the valve is turned on.
Car with remote control
Homemade radio-controlled models captivate not only children, but also adults. They can be used for playing at home or for real competitions in the yard. To assemble it yourself, you will need a chassis with wheels, an electric motor and a housing.
There is a large assortment on sale, but first of all you need to decide which machine is best to make. The control panel can be wired or radio controlled.
When choosing parts, you should pay attention to their quality. There should be no nicks, inclusions or other mechanical defects on the plastic. The wheels are sold with the chassis and should turn easily. Grip on the surface is better provided by rubber. Plastic wheels are much worse in this regard.
For a beginner, it is better to take an electric motor, which is cheaper and easier to maintain than an internal combustion engine. You can choose any body or make it according to your own sketch.
The motor, battery and radio unit with antenna are installed on the chassis of the mini-car. If you purchase a kit with components, assembly instructions are included.
After installing the parts, the operation of the motor is adjusted. The housing is installed on the chassis after everything is working.
You can assemble mini-copies at home as follows:
- the car is assembled carefully and through joint efforts;
- the materials of the model parts may differ from the original;
- small and insignificant details can be omitted.
The model can be made without focusing on a specific car brand. Much depends on finances and availability of free time. Assembling a mini-car at home with a child has great educational value.
The work on assembling the car model is carried out according to plan. Some parts need to be purchased, but you can use old toys.
The power of the motor must match the weight of the device. Fresh batteries or accumulator are used for power supply.
If you use a special car designer, crafts can be very diverse. Assembly sequence:
- the frame is assembled first;
- the motor is attached and adjusted;
- the power supply is installed;
- the antenna with the radio unit is fixed;
- wheels are installed and adjusted.

Types of radio-controlled car models
Many DIY tricks are revealed in this video.
Electronic homemade products can make life more comfortable and save a lot of money. In addition, you can find a use for old electrical appliances so that they do not gather dust in the pantry without a purpose. Useful DIY crafts are often better than factory-made products.
Electronic homemade products, today, are an affordable way to manufacture useful mechanisms that can make life easier and diversify leisure time. Modern craftsmen are able to assemble with their own hands both simple toys and complex, multi-tasking mechanisms. Read below to learn how to quickly and easily make electronic toys, interesting and useful electronic crafts for your home and car!
Simple DIY electronics: making a spinner
Electrical engineering today is widely used for both practical and entertainment purposes. Some inventions (such as the smart home system) will be quite difficult for a beginner to make. They require experience and advanced knowledge of physics. Other designs are simple and accessible to beginner radio amateurs. For example, you can make interesting toys with your own hands - spinners, the sales of which have increased incredibly this year.
To assemble the toy you will need to stock up on:
- Wooden blank measuring 9x4x1.2 cm;
- Bearing size 2.2x0.8x0.7 cm (with rubber seal);
- Two RGB LEDs;
- Two CR2032 batteries and holders;
- Stainless steel bolt 0.8x2 cm;
- M8 cap nuts.
After this you can start working. First of all, you will need to find a design diagram on the Internet and transfer it to a raw block - a workpiece. To correctly mark the technological holes (there will be three of them), you will need a ruler.

Then follows:
- In the middle of the workpiece, drill a through hole with a diameter of 2.2 cm for the bearing;
- Drill two holes on the sides of the workpiece with a diameter of 2.5 cm and a depth of 7.5 mm;
- Using a drill, make two holes with a diameter of 6 mm for LEDs in the middle of two blind holes;
- Countersink the holes;
- Give the toy a rounded shape using a jigsaw, band saw or jigsaw;
- Sand the workpiece with sandpaper and coat it with varnish;
- Solder the LEDs to the battery holders;
- Check the LEDs and install them in the mounting holes, fixing them with super glue;
- Clean the bearing and treat its insides with WD 40;
- Cut off the bolt head and secure the axle in the bearing on both sides with nuts;
- Install the bearing into the mounting hole.
The spinner is ready! The toy will be interesting not only for children. Adults can also use this electronic device: the device, rotating, will help you relax or get distracted.
Simple DIY electronic circuits: making an electric call
You can make an electric call quite simply and quickly with your own hands.
Such a call will last a long time and will please the ear. After all, when pressed, it will be able to create signals of different frequencies and tones.
Thus, an electric call can be single-tone or multi-tone.
The ability of the bell to reproduce sound in one or more tones will be influenced by the presence of a multivibrator with two bipolar transistors in the radio design circuit. Let us consider in detail the circuit of an electronic call with a complex sound signal.
So, a homemade electronic circuit will consist of the following radio components:
- Step-down transformer series TA;
- Call button;
- Five alloy silicon diodes;
- Electrolytic capacitor with a capacity of 1000 microfarads
- Two electrolytic capacitors with a capacity of 10 microfarads;
- Two trimming resistors with a resistance of 470 kilo-ohms;
- Two MLT resistors with a resistance of 10 kiloohms;
- Two MLT resistors with a resistance of 33 kilo-ohms;
- MLT resistor 1 kilo-ohm;
- MLT resistor 470 kilo-ohm;
- Three silicon-plenary transistors type 630D
- Silicon planar transistor type 630G.
The operating principle of the device is simple. Pressing the button will open the third transistor of type 630D, allowing current to pass to the fourth transistor of type 630G. This will create the primary signal. When the second transistor of type 630D opens, the third and fourth transistors will be locked, creating a signal of a different tone.
DIY crafts for the car
Automotive electronics are in great demand today. At the same time, homemade automation often has simple circuits, easy execution and installation. What kind of electrical homemade products can you make for your car yourself?
So, you can do the following for your car with your own hands:
- Dynamic turn signals using the KIT DIY constructor;
- Universal charger from old electronics;
- Water pump based air conditioning;
- Heated wipers and much more.
The easiest way would be to design a backlight for the seat belt buckles. To do this, you will need to dismantle and disassemble the locks using a flat-head screwdriver. After that, using hot-melt adhesive, you need to secure the LEDs in the locks.
Each LED can be turned on through its own current-limiting resistor: this will extend the life of the semiconductor light-emitting device.
After this, you should assemble the locks, and run the wires powering the LEDs under the seats to the ignition or the parking button through the cigarette lighter. At the owner's request, the car's interior lighting can be supplemented with lamps that indicate that the seat belt is not fastened.
Unusual electronic homemade products: do-it-yourself binary clocks
You can make cool binary clocks for your home with your own hands. To do this you need an Arduino platform. The electrical circuits on this platform are simple and convenient; they are used for the manufacture of most electronic homemade products.

Additionally, to make a binary clock you will need:
- Real time clock module on DS1302 chip;
- Diffuse LEDs with a diameter of 1 cm (20 pieces);
- Resistors with a resistance of 10 Ohms (20 pieces);
- Resistors with a resistance of 10 kilo-ohms (2 pieces);
- Two tact buttons;
- Frame.
The watch case must consist of two halves, which can be made of wood, plastic, or metal. It depends on what style your watch will be. Before making the case, you will need to assemble the LED matrix.
In this case, each LED must be connected through its own current-limiting resistor.
After this, the leads from the LEDs must be connected to the platform. The controller itself will need to be connected to the real time clock module. After this, the contacts from Arduino and the module must be routed to the clock buttons to set the time through resistors with a nominal value of 10 kilo-ohms. They will serve as load bearings. Finally, you should connect the power cable to the circuit.
Useful DIY crafts: how to make household scales
Today, almost every home has a floor or kitchen scale. In order to make this useful measuring device yourself, you need to understand its structure and operating principle.
Thus, the external components of the scales include:
- Weight processor;
- Frame;
- Display screen;
- Platform;
- Legs.
The principle of operation of the scales is extremely simple. The load, falling on the platform, presses on it due to gravity, activating the strain gauge load cell inside the device. The strain gauge, in turn, influences the strain gauge, changing its resistance. The latter transmits the signal to an analog-to-digital converter. After this, the ADC converts the signal to digital and feeds it to the microcontroller, which draws conclusions about the mass of the load on the platform and displays the values on the screen.
When assembling the circuit, you need to pay attention to the type of strain gauge.
So, for a central location under the platform of floor, commercial and technical scales, it is better to choose a single-point sensor. For bending installation, a block sensor is used. In this case, you need to ensure that the strain gauge has a reliable connection to the ADC. A weight processor will help solve the problem of connecting devices.
DIY radio circuits for the home: making an electronic lock
Electrics can also serve to protect your home. So, today, DIY sites offer simple radio circuits for electronic locks for the front door. It is impossible to open such a lock using a physical key.
The simplest electrical circuit for making a lock is usually based on a four-digit Johnson meter.
This scheme can be implemented in several variations. The simplest one is using the 4017 microcircuit. The principle of operation of the circuit is quite simple: when you enter the correct four-digit code, a logical unit is activated at the input of the microcircuit, which opens the lock.
Let's take a closer look at the operation of the device:
- When the wrong keys are pressed, the circuit restarts without triggering the mechanism through the RESET input.
- The correct signal, when a key is pressed, must be sent to field-effect transistor VT1, which, after opening, supplies voltage to the output corresponding to the key;
- After the correct code has been completely entered, from the output corresponding to the last correct key, the signal is sent to the transistor VT2 connected to the relay;
- The transistor is activated for a time that determines the capacitance of the capacitor;
- The relay opens an actuator (for example, a latch).
In order to open such a lock, you will need to go through about ten thousand different codes. At the same time, the numbers on the code should not be repeated. That is, code 3355 will not be possible; all digital values must be different.
Most of the electronic homemade products that modern craftsmen make are designed to perform ordinary household tasks faster and better than authentic devices. For example, an electric spinning wheel will significantly speed up the process of creating yarn. You can quickly make an electric spinning wheel by placing an electric motor on an authentic device.
At the same time, the motor for an electric spinning wheel must have a power of at least 15 W.
As a motor, you can use a motor from a fan, auto cleaner, or player. The pedal must be used to operate the engine. It will be possible to change the movements of the motor by including a TP-type toggle switch in the circuit, which provides connection of a capacitor and resistance to different windings.
An electric fly swatter will be useful and easy to assemble and operate.
In order to implement such a mechanism, you will need to assemble a standard blocking generator. At the same time, you will need to remember to insulate the handle of the fly swatter.
Where to find amateur radio circuits and homemade products
Modern sites for radio amateurs offer to make not only useful, but also unusual homemade radios. So, for example, on the Mozgochina website you can find interesting electronic circuits for making refrigerator reminders, thermometers that change color depending on the temperature, etc.
Electrical gadgets for everyday life and crafts made from scrap materials for fishing from the site “Visiting Samodelkin” will be interesting and useful.
You can read about how to design, debug and manufacture electronic mechanisms at home in the book “Entertaining Radio Electronics”. New items among homemade radios are often posted on the “Amateur Radio Workshop” website. New issues of the magazine “Radio Amateurs” contain interesting and useful technical materials.
DIY crafts at home (video)
Amateur radio clubs today are popular among both schoolchildren and adults. Master classes and radio circuits presented on various websites allow you to assemble almost any electrical appliance at home. The main thing is to find the necessary diagrams, strictly follow the instructions, and adhere to safety precautions when working with electricity. And you can collect whatever you want!
