Olga Strebnyak
How beautiful the autumn season is! Poets and composers sang it in their works, artists painted many paintings - after all, autumn is truly a magical time. In my work with children, I try to use every day of this enchanting time of year to show the bright colors of autumn, listen to beautiful music, read poems by great poets, and, of course, I do not miss the opportunity to make all kinds of crafts from natural materials.
After all, the rose is the queen of flowers.
There is nothing more tender and beautiful in the world,
Than this bundle of scarlet petals,
Opened with a fragrant cup.
S. Ya. Marshak
The ancient Greeks considered roses a gift from the gods, and the Romans considered them a symbol of courage and embossed her image on their battle shields.
I love roses very much and try to master all sorts of ways to make them from fabric, ribbons, paper, orange peel, and of course, from autumn leaves.
Maple leaves are rightfully considered the most beautiful leaves in autumn. The guys and I have already made many arrangements of roses made from maple leaves. But I believe that other leaves can be perfect for making them, for example, birch leaves.
I would like to offer for your consideration one of the ways to make a rose from birch leaves.
We select leaves of different sizes, about 7 - 8 pieces of small, medium and large
We cut off the sharp tip of the leaf to give it a rounded shape.

We fold several of the smallest petals so that one slightly covers the other.

Roll them up into a roll. This will be the core of the flower.

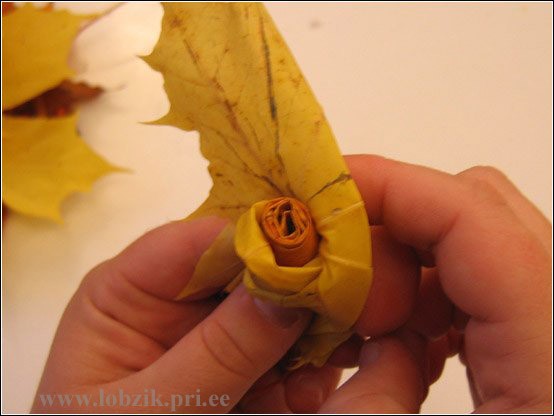
Around it we place the following petals one by one, small, then medium, and large.

To prevent the rose from falling apart, do not forget to often fix it with a thread at the base of the flower.


So our rose is ready. The outer petals can be slightly bent to give a more natural look. For the “greenery” framing the flower, any beautiful leaves are suitable. I borrowed them from the roses themselves.

(If you need a bud, then use fewer petals).
This is the composition I came up with

To keep our flowers longer, you can spray them with hairspray or open them with sunflower oil with the addition of a few drops of any essential oil.
Enjoy your creativity. I will be glad if this material is useful to someone.
Autumn is not only cloudy days and raindrops that constantly drum on the windows and roof, but also a time of bright colorful landscapes. During a normal walk. which takes place in a city park or public garden, it is easy to assemble a whole collection of materials of various sizes, shapes and colors (yellow, brown, green, red, orange), with the help of which craftswomen, and even children, create crafts from tree leaves with their own hands for gifts or home decoration, interior decoration, for school exhibitions, presentations for Teacher's Day or the autumn holiday.
Step-by-step instructions for crafts for children using tree leaves
The variety of forms, and along with them the stunning colors of autumn leaves, make it possible to create many compositions, ekibans, herbariums, appliqués and crafts. If we talk about subjects, birds, zodiac signs, fairy-tale creatures, animals, decorative elements and jewelry are considered popular. It is especially interesting to involve a child in such creativity, because creating masterpieces develops his imagination and creative potential. Use the following step-by-step instructions to teach your child how to create fun DIY crafts.
Volumetric applique Owl from birch leaves
To create an owl, birch leaves are best suited; they are small in size, have an even contour, due to which they easily fit into the drawing making it three-dimensional.
Required materials and tools:
- album sheet of white cardboard;
- stationery scissors;
- birch leaves;
- simple pencil;
- black buttons or toy eyes;
- PVA glue;
- 1 sheet of white, black, red paper.
Step by step execution:
- To begin, draw on cardboard or print out the silhouette of the future owl.
- Next, carefully cut out the cardboard bird.
- Visually divide the owl into horizontal rows, apply glue to each one in turn and lay down the leaves. It is recommended to start gluing the sheets from the bottom row, gradually moving up to the top row until we have completely covered the entire owl. Lay the leaves overlapping each other.
- For the eyes, take white paper, cut out two circles, and glue them onto the owl with glue. We use black buttons as pupils, which need to be attached to the paper eyes with glue.
- We use red paper for the legs and beak, cut them out, and glue them to the owl with glue.
Autumn craft hedgehog made from pine cones and leaves
Not only leaves are used for crafts, other natural materials are also added to them - chestnuts, cones, acorns. Try making a funny hedgehog with your child. Necessary materials:
- Pine cones;
- plastic bottle (0.5 or 1 liter);
- stationery knife;
- a piece of thick cardboard;
- brown plasticine
- glue "Moment";
- two bottle caps;
- black acrylic paints.

Progress:
- It is advisable to take a bottle of a dark color (brown or black); if this is not available, a transparent one will do, but then it must be completely painted with acrylic paints.
- We attach the bumps to the painted bottle using glue, starting from the back of the future hedgehog. Make sure that the cones are firmly fixed to the bottle. We cover the entire bottle with cones, except for the “face” and “tummy” of the future animal.
- When the hedgehog’s body is ready, we move on to creating a nose - to do this, we paste the bottle cap with brown plasticine.
- For the eyes, we take two white bottle caps, in the center of which we draw pupils with acrylic paint.
- Glue the finished eyes to the muzzle with glue.
- The craft is almost ready, all that remains is to decorate it. To do this, spread the moss on a piece of cardboard and place the hedgehog on it.
- Place leaves and rowan berries on the back of the animal.
Composition of leaves Firebird
With the help of autumn leaves, children's fairy tales can come to life in original compositions. For example, we suggest trying to create a Firebird. Required materials and tools:
- a piece of white cardboard;
- yellow and black acrylic paints;
- PVA glue;
- red and green maple leaves;
- scissors;
- birch leaves;
- stems with ash leaves;
- stems with leaves of white acacia;
- birch leaves;
- simple pencil;

Step by step execution:
- Draw a silhouette of the Firebird with a bushy tail on cardboard and cut it out. Paint the bird's body up to the tail with yellow acrylic, and draw an eye in black. Wait until the paint dries.
- Then we start decorating the Firebird, starting from the bottom of the tail. Apply glue to a strip of cardboard tail and tightly fasten the golden ash stems.
- In the next layer, a little higher, we glue a row of red maple leaves, 3rd row - green maple leaves, fourth - birch leaves, fifth - green maple, sixth - white acacia stems, seventh - birch leaves, the final row - red maple leaves.
- When the tail is ready, we begin to create the wing. Again we begin to attach the leaves with glue from the bottom row in the following sequence - ash stem, red maple leaf, green maple leaf, birch leaf, red maple leaf.
- The fabulous Firebird is ready!
Tree leaf mask
For a children's Autumn party in kindergarten or school or a masquerade ball, make an original mask with your child. You will need:
- maple leaves of different sizes;
- cardboard;
- strong rope, ribbon or elastic band;
- stationery scissors;
- glue;

Step by step execution:
- Draw a blank for the mask on a cardboard sheet and cut it out along the contour.
- Make small cuts along the edges of the mask and tie a thread so that in the future the product will stay well on your head.
- Glue the cardboard blank with glue and leaves. Start attaching the large leaves around the edges first, and the small ones in the middle.
Vase of autumn leaves
Autumn leaves are used not only to make children's crafts, but also to decorate home interiors. We offer to make an original vase for sweets or fruits. Necessary tools and materials:
- PVA glue;
- balloon;
- petrolatum;
- glue brush;
- scissors;
- Maple leaves.

Step by step execution:
- We inflate the ball to the required size, the more capacious the vase is needed, the larger the ball will be.
- To ensure that the leaves are well separated from the ball, before work we lubricate it with Vaseline.
- For convenient work, we fix our ball in any container and begin to make a vase.
- Using a brush, generously coat each maple leaf with glue and apply one by one to the inflated ball.
- Lay out several layers of leaves.
- Once again, completely coat the almost finished product with glue and wait until it is completely dry (48-72 hours).
- Then deflate the balloon.
Photo frame
All children love to decorate the walls of their room with photographs or hand-drawn pictures. Help place your child's favorite photo in an original, homemade frame. Necessary materials:
- cardboard;
- glue;
- leaves;
- simple pencil;
- scissors.

Step by step execution:
- Prepare a cardboard frame of the required size. Make the middle of the frame (where the photo will be) a little smaller than the photo.
- Before decorating the frame, dip the leaves in hot water, they will become soft.
- Next, use PVA glue to glue the frame with leaves.
- Place the finished craft under a stack of heavy magazines or books. We are waiting for the frame to dry.
- We insert our favorite photo into our composition, securing it at the back with tape.
Applique Lion and fish on paper made from dry tree leaves
Colorful and bright applications are obtained if whole leaves are used for their preparation. Children love to create different animals and birds - a bunny, a fox, a horse, a cockerel, a cat, a dog, etc. We suggest making a funny lion cub and fish. Required materials for the lion:
- yellow linden leaves;
- black felt-tip pen or marker;
- ash seeds;
- horse chestnut fruits;
- PVA glue;
- dry pine twig;
- scissors;
- yellow colored paper;
- orange cardboard.
Step by step description:
- Print or draw a lion's head on yellow paper and cut it out.
- Glue the mane in a circle using glue in several rows with linden leaves.
- Use a black felt-tip pen to paint over the lion's nose and glue one chestnut to it with glue.
- We use needles from a dry pine twig as antennae for the lion.
- The tongue will replace the ash seed glued with glue.
- When the product dries, the craft will be ready.

Necessary materials for the fish:
- yellow linden leaves;
- PVA glue;
- brown quince leaves;
- marker;
- ash seeds;
- acorns;
- stationery scissors;
- blue colored paper.
Step by step description:
- Print the fish template on blue paper or draw it with a marker and cut it out with scissors.
- Cut a stalk from each linden leaf and use glue to attach them to the frame in the form of fish scales.
- Glue a few quince leaves onto the tail of the applique and decorate with ash seeds.
- Attach the acorn caps to the fish using glue along the line of the head. Your DIY tree leaf craft is ready!
How to dry leaves for crafts
Dry leaves are an excellent free raw material for various herbariums, applications, and crafts. In order for your crafts to last for a long time, you need to learn how to properly dry leaves. To do this, study these rules:
- Collect natural material only in dry weather.
- Choose leaf color yellow or green.
- Pay attention to the appearance of the leaves. The most suitable ones will be smooth, beautiful and clean, without damage or black spots.

There are several options for drying leaves. Let's look at each:
- Long-lasting and high-quality method (takes 14-30 days). Carefully level each leaf and place it between the pages of the notebook, which must be placed in a large thick book. Weigh the book on top with something heavy.
- Accelerated. If you didn’t have time to make the preparation, but you already need leaves for tomorrow, this method is the most suitable. Place the leaves between the newspapers and iron them with a warm iron 3-4 times. Then let the plants cool and repeat the procedure several more times. It is worth saying that when using this method, the plants become fragile and cannot be stored for a long time, the green leaves immediately darken, and the yellow ones remain bright.
- Alternative. Some craftswomen have gotten used to preparing leaves using a hairdryer. They claim that with this method the plants do not darken, but there is a chance that the leaves will curl into a tube.
Video tutorials: on creating crafts from tree leaves for children
Nature in autumn fascinates with its riot of colors, so children often bring bouquets of colorful leaves from their walks. Invite your child to make a craft from tree leaves with his own hands, because this is not only an interesting, exciting idea, but an easy way to introduce your child to nature, broaden his horizons, and teach him to develop his imagination. Creating such compositions is not difficult; use the following step-by-step instructions as an auxiliary video.
Panel of acorns and autumn leaves for elementary school
Master class on creating a butterfly and a mouse for kindergarten children
Craft - autumn bouquet of roses from maple leaves for schoolchildren
Beautiful pictures on cardboard for the holiday of autumn for kindergarten
DIY hedgehog in the grass made of leaves and flowers
Crafts from leaves, cones, chestnuts and acorns for activities with children
Photos of handmade crafts from tree leaves
Decorative elements made from natural materials will help create an atmosphere of celebration and comfort in your home. Such products will fill your home with a positive charge and favorable energy. To create a real masterpiece with autumn leaves, you will need patience, accuracy and imagination. For inspiration with interesting ideas, we recommend viewing a selection of photographic works made by boys and girls with their own hands under the guidance of adults.
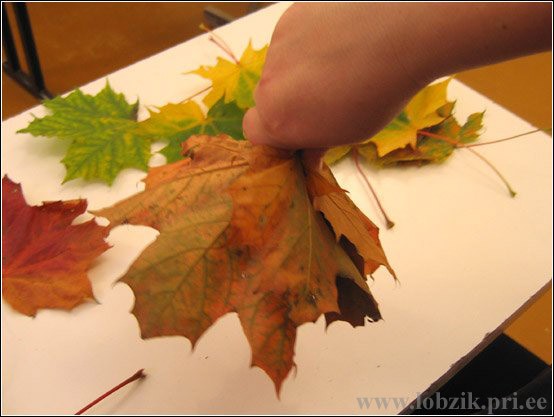
Naturally, the first thing we do is collect the leaves. Leaves that are too small, dry, diseased, or torn are NOT suitable for us. We will use different colors.
For one flower, it is better to choose leaves of the same color.
We fold the first sheet in half across the central vein so that the front side is on the outside.

Now we roll this folded sheet into a tight roll.

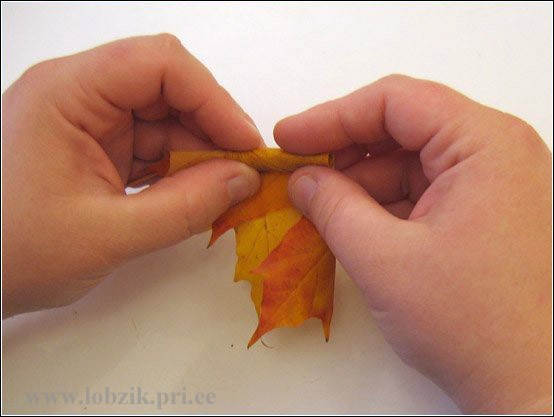
This roll will be the core of the future rose.
Now we begin to lay “petals” around this core.
To begin with, take a sheet and place the core in its center. Notice that the front side of the leaf is inside the flower!
We bend this sheet outward in half. The edge of the bend is located above the core by a centimeter and a half.

And now we also bend this protruding edge outward. But we no longer smooth out the fold...
... and we wrap the side edges of this double-folded sheet on both sides around the core.


We pinch the lower edges of the leaf at the very base of the flower.
We take a new sheet for the next “petal” and repeat the operation just performed, only this petal is located on the side opposite to the first sheet.


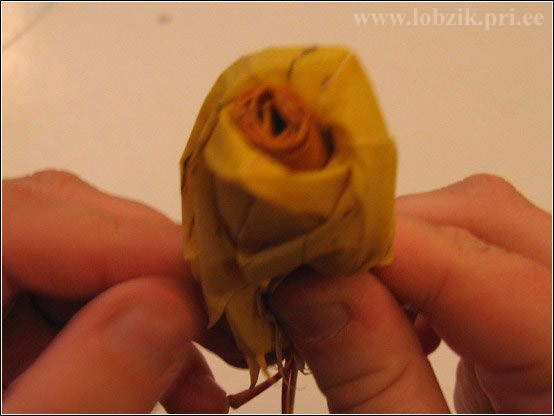
Here, several stages of the same type, shown above, when the petals are collected into a bud, are skipped. Add them until you feel like you have enough.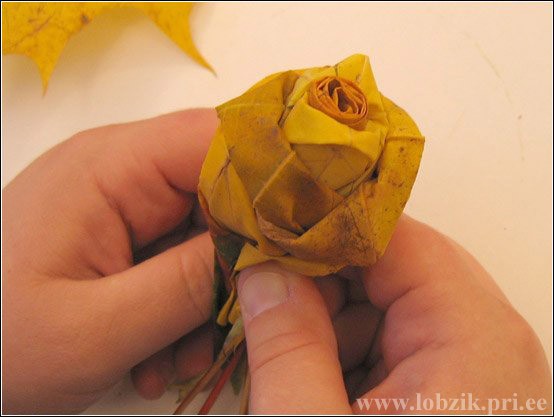
When the bud is ready, we tie threads around its base to secure the flower.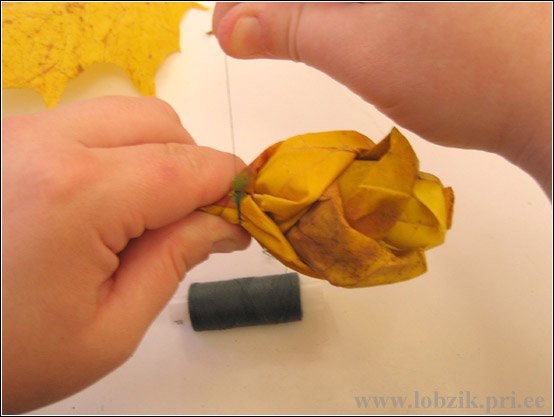

How many flowers there will be in your bouquet is up to you. For this “photo shoot” three were enough for us.
Now let's deal with the "greens". The most variegated leaves are suitable here.
To prevent these leaves from curling into a tube the next day when drying, it is better to first iron them between sheets of newspaper. They will become more fragile, but careful handling will not damage them.
We evenly place these leaves in a circle under the buds and fix the now finished bouquet at the base with the same threads.
On top of the threads, by the way, you can wrap this knot with yellow paper tape (painting tape), this will hide the threads and make the look more neat and complete (there is no paper tape in the photographs).

Here the autumn bouquet is ready.
ADVICE: “In order to last longer, you need to lubricate the already rolled roses with vegetable oil (with a brush). It is absorbed after two days, the leaves become soft, do not dry out, do not lose color and do not shrink. This dawned on me the day before yesterday. :) I smeared half of the roses - today is the difference on the face."
Happy beautiful autumn everyone!
Autumn time... For some, this is a time of despondency and sadness. It’s starting to get dark earlier outside, and getting up in the morning is becoming so difficult and lazy... Winter is approaching.
But for needlewomen, autumn is not a time for sadness. This is another reason and opportunity for creativity, inventing and bringing your unusual idea to life.
If you are also interested in handicrafts, you just need to read the article! It describes in as much detail and clearly as possible how to create flowers from tree leaves.
Autumn is a charming time, nature colors the leaves in incredible red, yellow, and crimson colors. Just imagine what wonderful roses or chrysanthemums they will make from tree leaves!
Something made with your own hands is the best gift!
Beautiful roses made from natural materials... They are quite simple to make. Don't believe me? Just try it yourself! If you are a caring mother and make charming flowers from tree leaves with your child (especially if you have a daughter), you will not only receive an original craft, but also spend time with your baby.

After all, doing something together is so wonderful! This helps us get closer and understand each other better. In family matters, any joint work can work wonders.
In addition, then the two of you can give unusual roses from tree leaves, for example, for your grandmother’s birthday or on March 8th. She will appreciate such a gift much more than a purchased postcard or box of chocolates.
It’s no wonder that handmade products are so valued in the modern world. And for a grandmother, things made by her beloved granddaughter or grandson will become the most expensive and wonderful gifts you can imagine!
Where to begin?
So, you have decided to create an amazing craft - flowers from leaves painted with autumn gold. But before you start turning your idea into reality, you should prepare a little.
To make flowers from tree leaves you will need:
liquid glycerin;
small dense package;
beautiful even branches (you will attach flowers from tree leaves to them);
sewing threads (preferably red or brown so that they do not stand out on your craft).
Personally, you will need a little time, patience and desire to create something original with your own hands!
Leaf assembly
In order for flowers from tree leaves to turn out neat and beautiful, you should choose even, not wet or wrinkled leaves.

Also, you should not take those that have already begun to rot. Believe me, this will not add charm to your bouquet. On the contrary, the craft will either turn out crooked and ugly, or it won’t work at all.
In addition, the size of the leaves also plays a very important role, so when assembling the material, pay attention to it. The leaves should be approximately the same size. This will help you easily and accurately make flowers from tree leaves with your own hands.
Leaf treatment
So you collected and brought the leaves home. Is it possible to make a bouquet out of them now? No, unfortunately, it’s worth holding off for now.
If you want to make natural and elegant flowers from tree leaves, the instructions described below must be followed.
At the preparatory stage, the leaves should be thoroughly cleaned. And simply washing them in hot water will not be enough.
To properly prepare the material for the craft, you should follow these steps:
You remember that the core of a rose has small petals, and the rose bud is framed by lush and wide ones? When making your own flower, you should follow the same principles. That is why you should start with the smallest leaf.
Take it and carefully bend it in half so that the outer side of the leaf is inside, and the top of the leaf and the tail (stick) are connected.
Happened? Great! Now roll the resulting structure into a tube. The core of the rose is ready!
Start by filling a small basin with warm (but not hot) water.
Add a little liquid soap there (the main thing is not powder, it will damage your leaves, and as a result the bouquet may not work out).
Stir until the soap is completely dissolved in the water and add the collected leaves.
Wait a few minutes (5-7 will be enough), catch the leaves and rinse them under the tap in slightly cool water.
Now treat the leaves by placing them in a tight bag filled with a solution of glycerin mixed with water in a 1:2 ratio. Place your herbarium in this form in a cool, dark place for 3-4 days. This procedure is necessary so that the leaves acquire firmness, elasticity, and shine.
After the required time has passed, remove the leaves from the bag, place them carefully on a towel and let them dry completely.
Forming the core of a rose from tree leaves
It is only at first glance that it seems that only professional and experienced needlewomen can build such beauty. Not at all!

Believe me, following the instructions presented in the article, even a child can make almost any flowers from tree leaves!
The master class is very detailed, the description of the process is clearly described step by step. Read it. You will definitely succeed!
To form the core of a future rose, you must keep the following in mind:

How to make a bud of a future rose
Well done! If you now have the middle of the rose in your hands, it means that you have practically mastered the simple technology. You have successfully figured out how to start making flowers from tree leaves with your own hands.
Now you can start forming the rose itself.
To form a rose, you should:
Take the next leaf a little larger.
Do the above procedure with it.
And, carefully applying it to the first tube, wrap it around it once.
Repeat the manipulations with 3-4 more leaves.
Carefully fasten the tails (sticks) of your leaves with thread.

That's all, the rosebud is ready! Not difficult at all, right?
A couple of turns - and the rose is ready!
So, the rosebud is ready! Now you can begin to form the rose itself. This process is a little more complicated, but more interesting. Aren't you afraid? So, let's get started!
To perform a rosette, follow the important steps:

When the leaves fall from the trees, they are unusually beautiful, and their color is very colorful. I will teach you how to make flowers from leaves with your own hands, and then combine these flowers into a bouquet. very simple and interesting. First, we need to collect maple leaves in the fall. We will make roses from leaves. Let's start sharing!

Take one leaf and fold it in half, so that the smooth side is at the top.

From this leaf we make the center of the rose, the core. We twist it, be sure to tightly.

When the center of the rose is ready, take another leaf and place it face down on the made core.

Now we bend the top of the sheet back, but so that the attached sheet is higher than the core, about a centimeter.

Now we wrap the twisted center of the flower with a leaf on both sides.

We do everything very tightly, so that our craft does not fall apart. When rolling, hold the leaves very tightly at the base.


We make the next petal, take a maple leaf, bend it in the same way as last time and apply it to our flower. But be sure to place the next petal on the opposite side of the previous one.


When you have made a sufficient number of petals, tie threads around the base of the rose and it will not fall apart. Create grand bouquets with leaf flowers.

Make as many roses as you want and now let’s design the bouquet. We fold the flowers and put simply beautiful leaves of a unique color around them.

Advice! To prevent the leaves from starting to curl on the outside, you can iron them quite a bit with an iron between newspapers.

To make such a bouquet last longer, you need to anoint the leaves with vegetable oil or paints and varnish.
