Wood has traditionally been a material used for exterior and interior decoration of residential premises. And today it’s openwork wood carvings, photographs, drawings and sketches which can be found in colorful art publications and on the Internet, amaze the imagination with its beauty and grace.
People who love to make decor with their own hands are able to master the art of artistic cutting. Wood allows you to create genre paintings and decorative compositions that you can decorate your own home with and give to friends. A favorite skill in the hands of a connoisseur of the beauty of natural materials can become the main profession. The demand for wooden carvings today is higher than ever.
Tools for work
In order to get started, you will need to select special tools and study the features of the technology. This matter has its own nuances that make it possible to more fully reveal the beauty of wood in the ornament.
You also need to stock up on suitable blanks and sketches that will be repeated on wood in the form of patterns, lace, compositions or genre scenes.

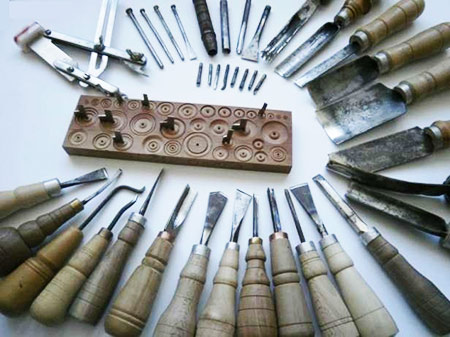
For his work, the carver uses a large set of tools:
- knives;
- jigsaws;
- needle files;
- chisels;
- electric drill;
- drill;
- bars;
- chisels;
- spoon cutters;
- milling machine;
- drill.
Advice for a newbie:When choosing tools for work, you need to focus on the quality and durability of such products. In the first stages, you can get by with a small number of devices.
A special set of tools is designed for a beginner. It will be enough to master the basics of artistic processing of wooden blanks.

You will also need raw materials from certain species. The quality of the product will depend on this. There are hard and soft varieties of trees. Each type has its pros and cons; in each specific case, a specific processing technology is selected.
Soft breeds include:
- Linden;
- birch,
- aspen
- pine;
- juniper.
Soft material is easier to process, but it is easier to ruin it with one wrong move of a knife or chisel. Another thing is hardwood. These include:
- Red tree;
- boxwood
Solid raw materials are expensive, but products made from them are beautiful, durable and in demand. Experienced craftsmen work with expensive rocks and know how to process a hard surface without breaking the tool or causing injury. Therefore, beginners should start with cheaper and more amenable material.

To select raw materials, it is necessary to take into account not only the hardness, but also the color of the wood. For beginning carvers, birch is an ideal choice for creativity. It can be cut in different directions and lends itself well to drilling and cutting. When choosing a design for a product, it is necessary to take into account that over time, light birch wood may darken.
For products with a large number of slots, coniferous species are suitable. The soft material of pine, spruce, and cedar allows you to apply large designs and create intricate patterns. Beginners can start with conifers, as well as linden, birch and aspen.
A beginning carver should learn the basics of craftsmanship from simple ornaments. For the first job you will need a small set of tools. First, you can get by with a jigsaw, an awl and a knife.

Before you start cutting, you should set up your workspace with good lighting. Having selected a suitable workpiece with a flat surface and without knots, you need to transfer the selected pattern onto the surface of the workpiece. You can use tracing paper for this. When the stencil is transferred, it is coated with varnish on top so that it does not disappear or deteriorate during work.
A beginner will need knives, chisels, and an awl. For through slots, it is better to use a jigsaw or a manual milling machine, this will save time and effort.
The carver must master all the techniques that he will then use in his work on the product. Using a variety of decorative wood processing methods, you can create artistic masterpieces.

Artistic themes and uses
The carver uses various sketches in his work, from which he takes an image and transfers it to the surface of the workpiece. Today, for this it is not necessary to use an image made by hand with a pencil. Modern technological advances make it possible to use photographs and scanned digital images that can be taken on the Internet.
Sketch of the ornament
Samples for artistic wood processing are distinguished by their decorative and thematic variety. On the Internet, websites dedicated to this craft offer a large selection of cutting themes. The façade of a wooden house is decorated with wooden patterns. This decor will look great on doors and walls. Artistic cutting is used for the production and finishing of furniture and tableware.
Kitchen utensils and interior wooden products decorated with intricate openwork are very popular among buyers. In each specific case, the master selects the material, creates a sketch of the future product and begins to work.

The drawings come in a variety of themes. Geometric plant motifs are used. Often the wooden surface is decorated with genre scenes depicting animals, people and trees. Wood is a very plastic material, and in the hands of an experienced carver it turns into a real artistic canvas.
For each type of artistic cutting, a special surface treatment technology is used. Using different techniques, the master creates a three-dimensional canvas on which you can see the smallest details of the image.

Variety of techniques
Various technologies are used for artistic wood processing. In each specific case, the choice of method determines the product itself, its purpose and the type of wood from which it will be made. During the existence of this applied art form, several cuttings stood out:
- flat-relief;
- embossed;
- excavation, or geometric;
- slotted;
- contour;
- volumetric.
The pattern can be through, flat, relief, volumetric, small and large. The choice of finish directly depends on the size and functional purpose of the wooden product. For large items, such as decorative carvings for house facades, a large pattern is used. For interior items and furniture, craftsmen apply small patterns to the product, which are carefully worked out.

Flat creased pattern
This image has a slight relief. The image has the shape of a silhouette, and all the details are located in the same plane. For execution, an oval contour, a cushion pattern and a selected background of the pattern can be used.
How subtypes of this technology are distinguished:
- contour,
- stapled
- geometric (triangular).
To perform the contour technique, in-depth lines running along the main background are used.

Staple technology uses special notches in the form of staples to create the finish. When using geometric carving, the master applies the outline using triangular pyramids and pegs. The type of cutting repeated many times in different versions allows you to create a variety of relief decors that are slightly recessed into the general background. This technique is characterized by numerous compositions of geometric shapes in the form of rhombuses, triangles, honeycombs, wreaths, etc.

Openwork or through technique
When creating openwork images, complete removal of wood from the center of the product is used. This drawing has no background. This type of thread technology is called through. It can be simple and openwork. With openwork design, the decor is made of different heights.
This is an ancient, primordial folk craft that has not lost its relevance today. Carved ornaments were used to decorate wooden products, which the craftsmen also made themselves. In ancient times, people were surrounded by wood: houses, furniture, even dishes were made by hand. If necessary, finished products were fired or coated with resin, varnish, and painted. Thus, wood carving was considered a full-fledged craft.
The thread itself is divided into two independent types: through, from which comes the slotted thread (when the through sections are respectively cut with chisels) and sawn thread (through sections are also removed, only by sawing out). Any craftsman's best friend is a jigsaw, regular or electric.
There is also overlaid wood carving, when instead of cutting, the master adds a design.
The stencil helps the master decide on the type of pattern, arrangement of parts, outline the perspective. Of course, some people prefer to draw sketches themselves, without prompting, on the wood being processed, and then cut out according to them. But if you need to create a specific item, it is better to arm yourself with a stencil. It doesn’t matter whether it is an overhead thread or a slotted one.
Previously, carvings decorated doors and windows of houses. The master covered the finished frame with patterns, choosing different motifs. Some depicted animals or plants, others created their own intricate patterns, removing the background from the product.
Slotted carving - where to start?
First. Any activity, be it a hobby or homework, requires a workplace where it is comfortable to sit and do business. Good lighting, tools nearby. Openwork wood carving helps to create a mood, calm the nerves, and at the same time complement the interior with beautiful, original things. What will you need?
- Comfortable chair, strong, good table;
- Lighting. You need a bright table lamp;
- A stencil of the selected design, a board, and the necessary tools.
For beginners It’s better to take a simple ornament, calculating forces. And the casing (plate) is small. It is important to get the hang of it, then gradually choosing a sketch is more difficult.
Gallery: slotted wood carving (25 photos)


Required Tools

 Second - choosing a tree. To beginners, all the boards seem the same, except that they are different in color. However, the most practical ones for carved ornaments are: linden, birch, beloved by bards, as well as alder or aspen. When choosing a tree, it is important to look at not the softest species. On the contrary, you need strong, low humidity. Such a platband will then last a long time and will not crack or crumble.
The wooden block must be processed in advance using sandpaper. The finished tree is monochromatic, if possible, smooth, without knots. Coniferous species are rarely taken.
The size of the board determines the chosen template. The thickness varies between 6 - 8 mm, which is the minimum, and 15 - 20 mm, which is the maximum.
Third. Selecting a template or stencil. The tree is considered unique material, on which both the ascetic ornament and the ornate, strange patterns that Art Nouveau is rich in look harmonious.
Should I choose a sketch or a stencil? A sketch is considered to be a contour drawing, an outline of a future product. Using a pencil, the master covers the wood with sketches, outlining the pattern.
A stencil is a ready-made carved template, not necessarily wooden. The product will turn out to be an exact copy, because the master traces the contours of the selected template, drawing out the pattern. However, it can be supplemented by introducing author’s adjustments. Then the platband will acquire its own, unique look. Craftsmen have entire sets of different stencils, from which they select the ones they need and can create entire compositions. Each pattern takes on a finished look after processing. For convenience, they collect the necessary stencils, making an album where the ornament is numbered or has a name.
Fourth - processing methods. Nowadays, rarely does anyone use a jigsaw or chisel, leaving the difficult work to electrical devices. So, the product comes out faster, better quality, fewer flaws.
True, it is possible to process a wooden frame in a different way. For example, cauterization. A special nichrome wire is taken, heated up very much, then the master burns through the wood with it. Cons: specific smell, also working tools need to be cooled every time, choice of material. After all, not every wire will work here. What you need is nichrome, preferably not used in production.
This method is unlikely to work for beginners. A hand jigsaw, chisel and other “simple” tools are better and safer. Of course, you won’t be able to create an openwork pattern right away, but why not depict an animal or a simple carved motif?
Laser cutting It is considered an improved method that manufacturers now use when they need to quickly and accurately process carved frames, creating complex patterns. True, this method requires expensive equipment and relevant knowledge from the master, because it needs to be controlled.
FAQ
 How difficult? A slotted carving and an album of ornaments will help you create a carved, three-dimensional pattern, where everyone can easily select a simple example from which to begin their journey of mastering a new hobby. Of course, the first product will not be perfect, but it will provide experience. Therefore, for beginners, it is important to choose wood more carefully so that it is easy to process.
If you want to decorate the gable of your house, how big will the product be? To begin with, it is better to choose places, not too noticeable, because the pediment is the face of the building, it is immediately visible. When you get better at it, you can complicate the tasks. Entire paintings are usually created from sketches, where the master changes the size and number of details. If the house is wooden, it is easier to decorate it. The ceilings, floor or side panels serve as a base on which it is convenient to carve some kind of ornament.
Tools for wood carving must be carefully selected. Wood carving as a type of decorative and applied art has a long history and has provided humanity with real masterpieces. At home, you can also create works of art, and simply diversify the interior. Although some modern models with electric drive have appeared (for example, a wood carving drill), in general the tool preserves traditions and is intended mainly for painstaking manual labor.
Different types of chisels for wood carving
Wood carving is the processing of wood to give it a special shape or create a relief on it. The following main types of such operations can be distinguished:

How to use the tool
When performing wood carving, the following work is carried out: drilling, sawing, cutting and gouging. To create a quality product, it is impossible to do without measuring tools.
During the work process, the need arises for auxiliary tools or devices that help fix the workpiece and limit the degree of impact.
The nature of the work determines the choice of the necessary tool. Historically, the best examples were made using hand tools, but the modern trend towards mechanization and automation of labor has not bypassed this area of activity.
 Set of various cutters for wood carving
 There is a whole range of machines, mini-drills (drills), jigsaws, grinders, etc. on sale. Certain products can be made in automatic mode using copy-milling devices (pantograph).
What types of knives are used?
One of the primary cutting tools used for wood carving is knives for wood carving of various designs and purposes. The following types of knives are distinguished:

What kind of chisels are needed when working?
Of course, the main handmade tools are wood carving chisels. The most common types of chisels include the following tool:

What other tool can you use?
In addition to the main devices discussed, additional tools are used when carrying out work to carry out specific work.
The following additional tool is usually used for wood carving:
- Spoon knives or spoon knives: usually a sharpened ring welded to a steel bar that is inserted into the handle - are used for removing accumulated sawdust in recesses, as well as for grinding the inside walls of large recesses, for example, when cutting utensils.
- Hammers and punches: durable metal rods with a specific pattern on the end. Most common when creating the main background.

When carving wood over large areas, various auxiliary tools are also used:
- For drilling work: gimlets, rotators, hand drills.
- When sawing: hacksaw, hacksaw, jigsaw, two-handed saw.
- Auxiliary equipment: mallet, staple, miter box, clamps, vice, various clamps, hammer.
To carry out measurements and markings, the following tools are used: ruler, square, protractor, leveler, measuring rod, plumb line, leveler, level, calipers, vernier calipers, bore gauge, surface thicknesser, compass, tape measure.
Slotted thread
The name of this type of carving means that with this method of wood processing, the background is removed. Therefore, such threads are also called sawing or through threads.
The techniques of slotted carving are quite simple, which is why it has been used since ancient times to decorate houses (cornices, platbands, etc.)
It can be used as an independent type and in combination with geometric and relief carvings. In the latter case, this work seems more labor-intensive, but very effective. Carved carving, combined with geometric and relief, is called through openwork, because it resembles lace (Fig. 90).
Rice. 90. Slotted carving on house decorative elements: A– frieze; b– top of the casing; V– overhead element
Secrets between the lines
Is it true that the hardest thing to cut out are the hands?
This is so difficult that history has recorded cases when a famous artist assigned the handwriting on his paintings to another. In carving, the development of hands begins with determining their general position, support (control) points of the forearm, joints, hands, and fingers. The sleeves are first made without folds, and the hands are made without fingers. The position of the fingers is determined by the points of the hand, and the features of the folds are determined by the points of the sleeve. Then the individual parts are cut into a partial profile. If there are no errors, final processing is carried out.
Slotted carving is characterized by the use of stencils, which greatly facilitates the work. If the design is not very complex, then it can be done with a hacksaw (Fig. 91). This hacksaw is called a trigger and has a narrow blade, shaped like a wedge. The final design can be finished with chisels (both straight and curved).

Rice. 91. Making slotted threads with a hacksaw: A– filing; b– final processing with a chisel
In those places where it is impossible to get close with a chisel, the final elaboration of the shape is carried out with a knife. The product is finished on both sides, which helps to clarify the silhouette of the ornamental composition.
The carver working with slotted carvings must be especially careful and precise, since the slightest chip or cut in the wood will spoil the silhouette of the ornament.
Saws that are used for cutting curved workpieces along the outer contour are called rotary. They come in narrow and wide varieties (web sizes from 4 to 15 mm) and are accordingly used for small workpieces that have steep lines, and wider ones that have a straight or smooth contour. The difference between this tool and a bow saw is that the blade rotates, therefore, without changing the position of the workpiece, you can saw in any direction.
Secrets between the lines
How to work with growth?
A variety of products can be made from a single growth, the shape of which can be clarified only by removing the bark from it. This is difficult because the surface of the build-up can easily be damaged, which will reduce the aesthetic value of the product. If the bark of a fresh growth is easily removed, then it is difficult to remove from a dried one. Therefore, it is better to work with dried material. The bark is cut with a knife or chisel, the cambium is cut with a cycle, after which they begin marking.
When performing slotted carvings, you can effectively use not only a hand-held (for example, a bow saw), but also a power tool, in particular a jigsaw.
The order of performing the individual stages of slotted carving is as follows (Fig. 92).

Rice. 92. Performing openwork carving: A– drawing a picture using a template; b– filing, marking guide recesses; V– making holes; G– sawing along the internal contour; d– finishing
First, they mark the workpiece, having previously secured it, after which they drill holes (small ones are made with an awl, and large ones with a brace), the pattern is filed along the contour, cleaned or chamfered (using sandpaper or a chisel, respectively). At the final stage, the product is polished, paying special attention to the recesses and corners, which should be clearly visible in order to emphasize the beauty of the relief.
A type of slotted thread is an applied thread, which consists of individual parts or elements and figures. A characteristic feature of applied carving is that the design on the wood is completed only on one side - the front side. This is explained by the fact that products made using this technique are glued onto the surface to be decorated (furniture, frames, etc.). Otherwise, it resembles openwork carving.
Secrets between the lines
Is it possible to carve items using bark?
This has long been practiced by carvers. But the bark should be very decorative and durable. For this purpose, birch bark (birch bark) is used, which is glued onto a prepared birch blank. In a product made from such material, the bark will contrast and enhance the artistic perception. This technique is usually used to cut out dishes.
From the book Stylish DIY Jewelry. Beads, bracelets, earrings, belts, headbands and hairpins author Khvorostukhina Svetlana AlexandrovnaCarving Carving is one of the most difficult types of decoration, because it requires some experience and precise hand movements. For this job you will need very sharp knives with thin blades. Carving is best done on thick leather, then the carved patterns can
From the book Secrets of Wood Carving author Serikova Galina AlekseevnaFlat grooved carving As the name of the carving suggests, its background is a flat surface (both the workpiece and the object being decorated), and the pattern is made up of recesses (notches) of various shapes. Flat threads are divided into contour and
From the book Wood Burning [Techniques, techniques, products] author Podolsky Yuri FedorovichFlat-relief carving When performing flat-relief carving, the image is located in one plane, while the relief, varied in pattern and composition, is revealed in a unique way. To do this, the background surrounding the element or ornament is selected or deepened. IN
From the book Wood Carving [Techniques, techniques, products] author Podolsky Yuri FedorovichRelief carving Of the varieties presented, relief carving is the most expressive, which is why in former times it was used to cover wall panels, furniture, doors and ceilings. It is still relevant when decorating the interior. There are 2 types of relief carving -
From the author's bookSculptural carving Sculptural carving is the most ancient and dates back to the times when people carved figures of pagan gods from wood, whom they worshiped and from whom they sought help and protection. In the period after the Baptism of Rus', they began to carve from wood
From the author's bookHouse carving The name of this type of carving speaks for itself: house carving is intended for the external decoration of a home and its interior decoration. According to the nature and technique of execution, house carving is heterogeneous and can be relief, slotted and
From the author's book From the author's bookFlat notched carving Flat notched carving is characterized by the fact that its background is the flat surface of the product or workpiece being decorated, and the pattern is formed by variously shaped recesses - recesses. The lowest points of the relief are located below the level of the decorated
From the author's bookFlat-relief carving The essence of relief carving is that a pattern (drawing) is formed by sampling the background around it. Such a sample can be uniform in depth. In this case, the formed pattern (drawing) will have the same height (usually 5–7 mm) throughout
From the author's bookRelief carving Relief carving is made by trimming a flat ornament left on a recessed background and working out shapes on the surface of this ornament. Relief carving has almost no flat surfaces. The shapes of the pattern are revealed by relief of different heights.
From the author's bookSlotted carving Slotted carving can be made using both the technique of flat-relief (with a flat ornament) and relief carving. The background in the slotted thread is removed with a chisel or saw. In the latter case, the thread is called kerf.
From the author's bookSculptural carving Sculptural, or volumetric, carving is characterized by the fact that in it the relief image is partially or completely separated from the background, turning into a sculpture. Unlike the one-sided image of an object in other types of carving, volumetric carving can be
From the author's bookHouse carving House carving is characterized by the fact that it is large-scale, is performed mainly on coniferous wood using an ax, saw, chisel and is used to decorate wooden buildings. Although house carving was popular already in the 16th century, before us
From the author's bookContour carving According to the technique of execution, contour carving as a type of geometric carving is the simplest. Images made in this way resemble a clear graphic drawing. Using different types of cuts and combinations of straight, curved,
From the author's bookGeometric carving All elements of geometric carving are the simplest geometric figures formed by straight and curved lines or a combination of tetrahedral or semicircular recesses. The main elements of geometric carving are dihedral,
From the author's bookStaple, or nail-shaped, thread Staple thread is performed with semicircular chisels, using a jamb knife as an auxiliary tool. As a result of using a semicircular chisel, a mark remains on the surface of the wood, similar to a bracket or a fingernail mark, hence
An ancient folk craft, widespread to this day, is woodworking. Modern machines, laser burners, plastics and other substitutes for figured carving on wood cannot replace the art of handmade work using real natural materials. One of the types of this interesting craft is called slotted carving.
Stencil and ornament
Not used as often as other types. But not at all because it is unclaimed. This is a technique that has been studied for years, although if you try to formulate what it is in a nutshell, then everything will turn out to be simple - this is a type of carving when the background, background, and substrate of the image are removed during the processing process.
Thanks to this, the design and ornament become airy, openwork, and the products amaze with their fabulous lightness. Moreover, this type of carving is not always performed on miniature planes. There are masters who do this with chainsaws.
Types of thread
In principle, among all types of carvings, which are conventionally divided into several groups, it is difficult, and there is no point in setting clear limits on technology, since the methods for manufacturing a particular product can be combined in any way you like. But for orientation, it’s worth mentioning some common wood processing methods:

Of course, this division is conditional, so we will not consider this type separately. Stencils, sketches and drawings of finished products, as well as photographs of striking works by masters, combine several processing techniques. For example, some textbooks highlight the cutting technology using jigsaws or saws, as well as the one that is performed with cutters and chisels.
Craft Basics
If you look at some photos of the works, you can clearly see that the authors used several methods of wood processing at once - when making various elements of decor or the exterior of buildings, flat-relief patterns with raw edges are rarely found, which means more than one or two technologies are used.
To begin getting acquainted with the basics of the craft, let’s remember how each of us held a jigsaw in our hands and cut figures out of planks or plywood. This is called the simplest slotted thread. More complex jobs will require more tools than a jigsaw and a dozen spare files, but the principle remains the same.
Technology and tool
To take the first step towards mastering the technique, we select a sketch or prepare a stencil if the pattern turns out to be complex and cyclically repeating. The design is transferred to the wood and then processed with the selected tool. To perform cutting, as a rule, soft wood species are used:

Depending on the chosen tool, the appropriate cutting technology is used. If a jigsaw or a hand jigsaw will be used for carving, in this case we drill holes according to the stencil for inserting the saw blade. This method is simpler, but errors are possible when working with jigsaws. A manual electric router is also used. In this case, high-quality processing of the edges of the drawing is guaranteed, however, working with a router requires experience.
Before choosing a design for a stencil, you need to compare the size of the finished product with the size of the image. In order for the design to be clearly readable, for large items you should not choose too delicate and small an ornament, but for small items, boxes, frames, an openwork pattern would be appropriate. Maintaining proportions is very important when choosing a stencil. This applies to both plant patterns and stencils of animals and ethnic ornaments.
Among the not very common methods of carving is burning. This is a productive method, but it requires a special machine, which is quite easy to assemble with your own hands. It consists of nichrome wire, a step-down transformer, and a filament current regulator. The nichrome thread burns through the wood, making it possible to complete the work accurately and accurately.
Laser cutting is also sometimes used, but this method is not available to everyone due to the high price of the equipment. But this is the most accurate and effective method. In industrial settings, CNC machines are often used. They help to quickly and accurately produce the same type of specified patterns for the production of large batches of products.
But the most important thing when working with wood is imagination and creativity. Using unique sketches for work, the products will be unusual and truly expressive, emphasizing the individuality of the master. Therefore, experiment boldly and good luck to everyone!
